Factory Resetting Insteon Devices

You can reset Insteon devices and restore them to factory default settings. The procedure to reset an Insteon device varies by device type. Factory resetting an Insteon device will erase all customized settings...

Sonos Player Features and Limitations

Use this article to understand the currently supported features and current limitations of Sonos Player integration.

Supported Features

  • Control play, pause, volume, and tracks for a Sonos Player from an Insteon Keypad, Mini Remote or Wall Switch

  • Trigger a Sonos preset from an Insteon Keypad, Mini Remote or Wall Switch

Controlling a Sonos Player from an Insteon device requires creating a scene. Learn more about creating a scene by viewing this article.


Current Limitations

  • App support is only available on iOS using the Insteon for Hub mobile app

  • Adding playlists is not currently supported on iOS 14+

  • A maximum of four Sonos Players can be added to the Insteon app.

  • Only one Sonos Player can be a member of a scene.

  • At this time, you are unable to edit Sonos Player functions from within a scene. If you wish to change a Sonos function after a scene has been created, delete the scene and re-create the scene with your desired changes.

  • At this time, Insteon app-learned presets do not work with all possible Sonos sources. The following sources have been tested and are known to function:

    • Amazon Music Stations

    • Apple Music Radio

    • Pandora Stations

    • tunein

  • To facilitate preset playback from an Insteon device, the Insteon app lets you learn source presets. Configuring these playlists is done from within the Insteon app when editing a Sonos Player settings.

    • You can learn up to ten Insteon app Sonos presets

    • These presets are shared among all configured Sonos Players

  • Insteon has tested Sonos support with the following Sonos Players:

    • Sonos Play:1

    • Sonos Play:3

    • Sonos Play:5

    • Sonos:Connect

    • Sonos Connect:Amp (ZP series)

    • Other Sonos Players may work but have not been tested by Insteon

  • If your Sonos Players or your router are disconnected from power, it may take up to two minutes before your Sonos Players are rediscovered by the Insteon Hub.
 

Sonos Player Not Found During Initial Setup

 
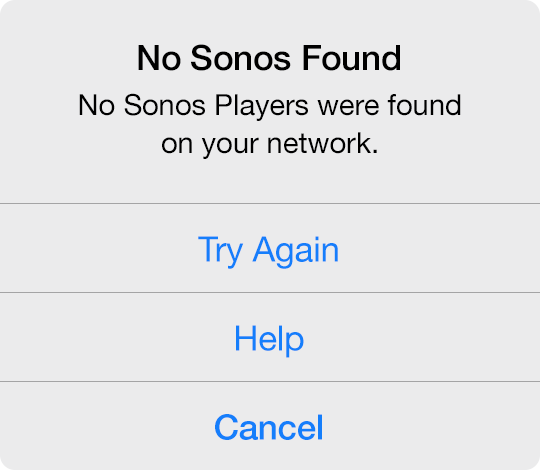
no-sonos-found.png
 

When adding a Sonos Player, you may encounter an alert informing you that the app was unable to find any Sonos Players on your network. There are several reasons why this may occur.

  • Your Sonos Player is unplugged from power

  • Your mobile device may be connected to a different Wi-Fi network than your Sonos Player or your mobile device may be connected to cellular only.

  • Your home's internet router or modem is not functioning properly


Basic Troubleshooting

  1. Ensure that your Sonos Player is connected to a working power outlet. If your Sonos Player is connected via ethernet, check that the ethernet cable is firmly seated. It may be helpful to unplug and reinsert the ethernet cable.

  2. Check to see if you can control your Sonos Player from the Sonos App on your mobile device.

  3. Confirm that your internet router and cable or DSL modem are connected to power and turned on. Learn how to Identify your router and cable or DSL modem.

  4. Try restarting your router and cable or DSL modem.


You Already Have the Maximum Number of Sonos Players Configured

When adding a Sonos Player, you may encounter a message informing you that you have already configured the maximum number of Sonos Players. Insteon Hub supports a maximum of four Sonos speakers.


Connect to Wi-Fi When Adding a Sonos Player

 
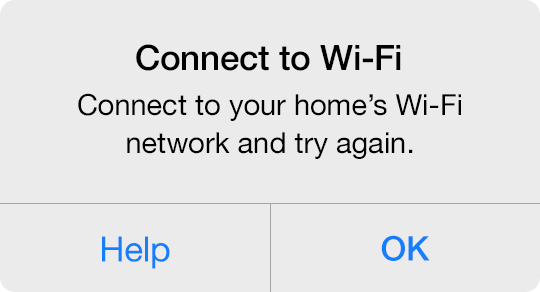
connect-to-wifi.png
 

When adding a Sonos Player, you may encounter an alert informing you to connect to your home's Wi-Fi network.


Basic Troubleshooting

Connect your mobile device to your home's Wi-Fi network. You are unable to add a Sonos Player to the Insteon app when on a cellular 3G, 4G or LTE connection.


Connecting to Wi-FI on iPhone, iPad or iPod touch

  1. Tap the Home button on your iPhone, iPad or iPod touch and navigate to Settings.
  2. Tap Wi-Fi
  3. Ensure Wi-Fi is on and tap your home's Wi-Fi network. If you have more than one Wi-Fi router, it is important to join the same Wi-Fi network as that used by your Sonos Player.
  4. Tap the Home button on your iPhone, iPad or iPod touch and return to the Insteon app to complete your Sonos setup.
 

Connecting to Wi-Fi on an Android device

  1. Tap the home button on your Android device and navigate to Settings.
  2. Tap Wi-Fi
  3. Ensure that Wi-Fi is on and tap your home's Wi-Fi network. If you have more than one Wi-Fi router, it is important to join the same Wi-Fi network as that used by your Sonos Player.
  4. Tap the Home button on your Android device and return to the Insteon app to complete your Sonos setup.
 

No Music Playing when Learning a Sonos Preset

 
no-music-paying.png
 

When learning a preset with your Sonos Player, you may encounter an alert informing you that no music was heard while listening to your Sonos Player. For the Insteon app to remember your musical selection in a preset, music must be actively playing from your Sonos Player.

Basic Troubleshooting

  1. Tap the Home button on your mobile device
  2. Navigate to and open the Sonos app
  3. Select the desired music from any of the sources available.
  4. When music begins playing, tap the Home button and return to the Insteon app.
 

Controlling a Sonos Player from an Insteon Device


To control Sonos functions or trigger presets from an Insteon device, create a scene for each desired function.


Create a Scene

Step 1

Open the Drawer and tap Create a Scene

tap-scene.png

Step 2

Give your scene a name that matches its intended function and pick an icon

name-and-icon.png

Step 3

From the Scene Members list of devices, tap the Insteon device or devices that you wish to use to control your Sonos Player.

With Keypads and Mini Remotes, select the corresponding button from the list of device buttons.

tap-keypad.png

Step 4

Tap the Sonos Player that you want to control

tap-sonos-function.png

Step 5

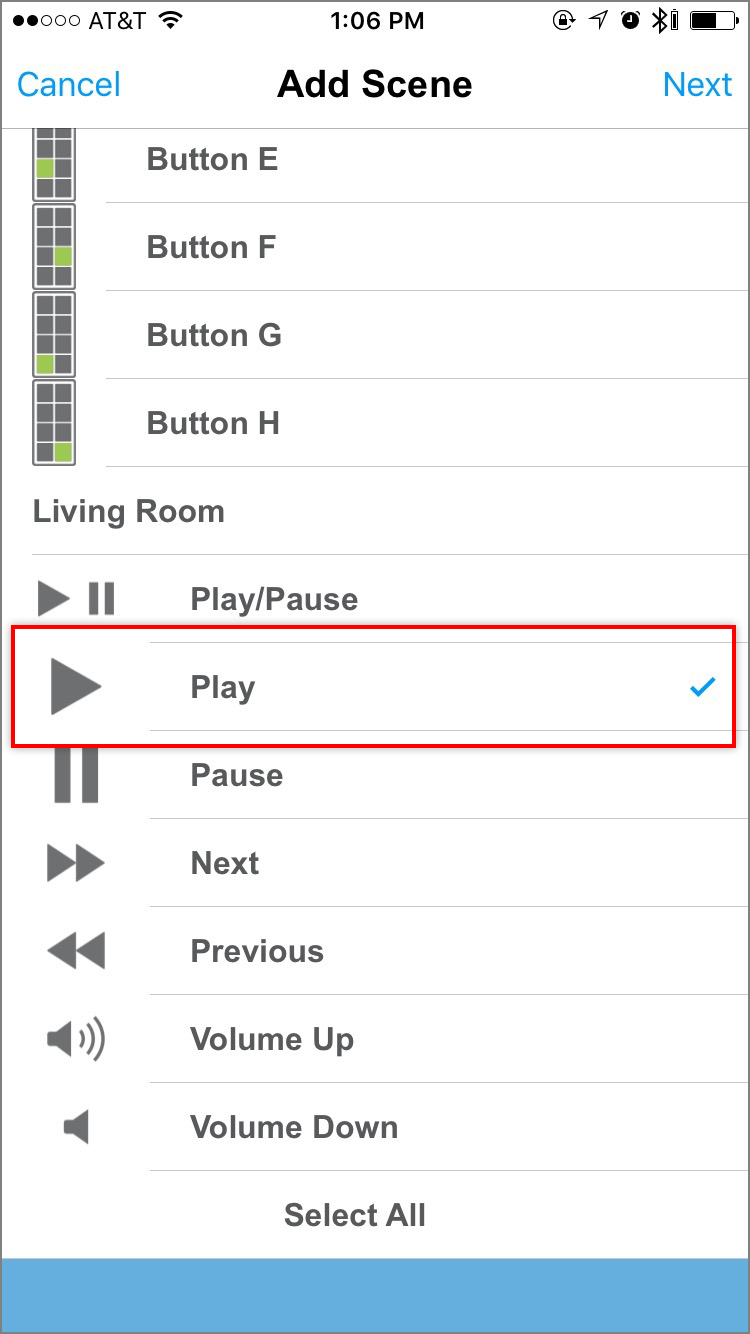
Tap the function you want to control and then tap Next

tap-sonos-function.png

Step 6

For each Insteon device, tap the blue Responder button until it reads "Both" and then tap Done.

Repeat the above steps for each additional Sonos Player function you wish to control.

tap-both.png
 

Additional Sonos Support


Use Groups to Control Multiple Devices Simultaneously with Amazon Echo


If you want to control multiple Insteon lights and appliances with a single voice command or control Insteon devices alongside connected home devices from other manufacturers that are also supported by Amazon Echo, create groups in the Amazon Alexa app.


Add Groups to the Amazon Echo App

Step 1

Launch the Alexa app and tap the “Devices” button in the bottom right corner.

Step 2

Tap the “+” sign in the top right corner to add a device or a group.

Step 3

Tap Add Group

Step 4

Give your group a name and select the devices that you would like to include. When ready, tap Save.


Step 5

Choose the devices you would like to add to your group and then tap on “Save” at the bottom of the screen.

Step 5 (edit).png


Supported Insteon Devices with Amazon Alexa

While Amazon Alexa supports control of many Insteon devices, not all devices are supported, some devices may not support all features, and some of those features are accessible only through Insteon scenes. Use the table below to identify if your device is supported.

Amazon Alexa control requires Insteon Hub (2245-222).

Identify your model of Insteon Hub

 
Device Supported with Amazon Echo
Dimmer Module Supported
On/Off Module Supported
Outdoor On/Off Module Supported
LED Bulb (A19)

Supported

LED Bulb for Recessed Lights (PAR38)

Supported

Dimmer Switch Supported
Dimmer Switch (1000W) Supported
Dimmer Switch (2-Wire) Supported
On/Off Switch Supported
Dimmer Toggle Switch Supported
On/Off Toggle Switch Supported
Dimmer Keypad (6-Button) Controls connected light only - scene buttons are voice controllable through Insteon scenes
Dimmer Keypad (8-Button) Controls connected light only - scene buttons are voice controllable through Insteon scenes
On/Off Keypad (6-Button) Controls connected light only - scene buttons are voice controllable through Insteon scenes
On/Off Keypad (8-Button) Controls connected light only - scene buttons are voice controllable through Insteon scenes
Dimmer Outlet Supported
On/Off Outlet (2011) Supported
On/Off Outlet (2014) Controls top outlet only - bottom outlet is voice controllable through Insteon scenes
Wired Thermostat Temperature changes only. Not all revisions support control with Amazon Echo.
Wireless Thermostat -
Venstar Thermostat Adapter -
Ceiling Fan Controller Controls connected light when addressing device directly - fan speeds are voice controllable through Insteon scenes
Dimmer DIN Rail Module Supported
On/Off DIN Rail Module Supported
Dimmer Micro Module Supported
On/Off Micro Module Supported
Open/Close Micro Module -
0-10V Ballast Dimmer Supported
Dimmer In-Line Module Supported
On/Off In-Line Module Supported
220V Load Controller (Normally Open) -
220V Load Controller (Normally Closed) -
WiFi Cameras -
Open/Close Sensor -
Hidden Door Sensor -
Motion Sensor -
Leak Sensor -
Smoke Bridge -
IO Module -
Mini Remotes -
Door Lock and Deadbolt Controller -
IR Transmitter -
IR Receiver -
Serial Bridge -
iMeter Solo -
SynchroLinc -
 

Amazon Echo Didn't Control My Devices As Expected


When using Amazon Echo to control your Insteon lights and appliances, you may encounter a situation where Alexa does not perform the expected or desired action. There are several reasons why this may occur.

  • Your voiced command included contradictory operations

  • Amazon Echo misheard your request

  • Amazon Echo heard your request correctly but an issue communicating with Insteon prevented your lights or appliances from operating as expected


Contradictory Commands

When issuing commands to Amazon Echo, ensure that your statements do not include contradictions. Amazon Echo may not respond as expected if you request multiple differing operations (off and brighten, for example) in the same statement.

If the names of your Insteon lights and appliances include words like "on," "off," "bright," "dim," or "set," Amazon Echo may misinterpret the name of your device as your desired action for that device. To avoid this issue, rename your devices using the Insteon app and ask Amazon Echo to discover your devices.


Amazon Echo Misheard Your Request

You can view a transcript of your requests to Amazon Echo. If Echo has misunderstood your request, you can also provide feedback on what you had hoped would happen.

Step 1

Launch the Alexa app and tap the drawer button in the upper left corner

Step 1 (edit).png

Step 2

Tap Settings

Step 2 (edit).png

Step 3

Tap Account Settings

Step 3 (edit).png

Step 4

Tap History

Step 4 (edit).png

Step 5

This screen shows your Echo’s history. You can sort by Date Range and delete recordings. You can also provide feedback to help Alexa understand you better by clicking on the down arrow by one of your recordings.

Step 5 (edit).png

Step 6

If the transcription does not match your utterance, tap "No" under Did Alexa do what you wanted. If the transcription does match your utterance but the expected Insteon devices were not controlled, contact Insteon Support and reference this article. If necessary, Insteon Support will create a support ticket to investigate your issue.

Step 6.0 (edit).png
Step 6.1 (edit).png


Control Insteon Devices from your Logitech Harmony Hub


With Insteon Hub (2245-222) and Harmony Ultimate Home, Harmony Home Control or Harmony Home Hub, you can integrate your Insteon-controlled lights and appliances with your home entertainment system.


Add Insteon Hub to the Harmony App

Step 1

Launch the Harmony app on your smartphone and navigate to Devices. Tap the Edit Devices button.

01-tap-edit-devices.png

Step 2

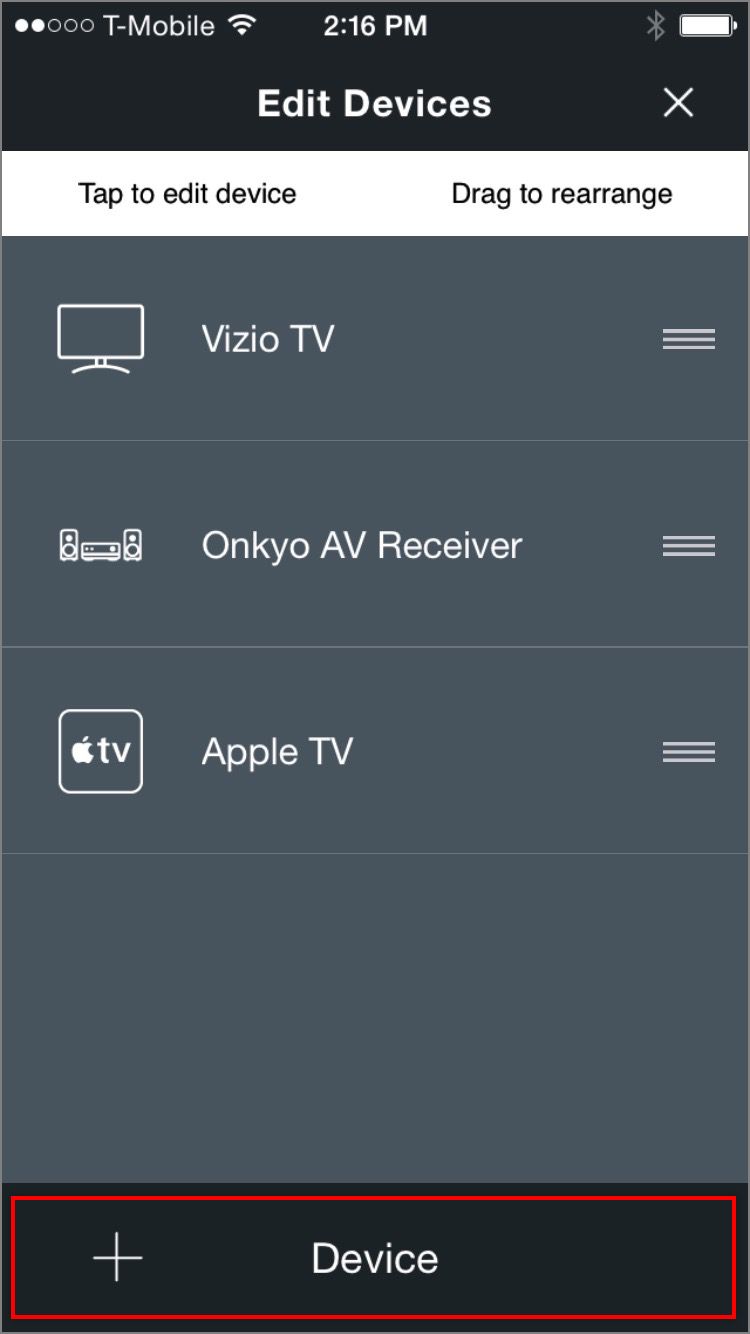
Tap the + Device button.

02-tap-add-device.png

Step 3

Tap Home Control

03-tap-home-control.png

Step 4

Tap Insteon Hub

04-tap-insteon-hub.png

Step 5

To connect your Insteon Hub to your Harmony Hub, you will need to enter your Insteon account information. Tap Sign In.


05-tap-sign-in.png

Step 6

Enter your Insteon account user name and password.


06-enter-username-and-password.png

Step 7

After a few moments, you will see a list of supported Insteon devices that can be used in Harmony activities.

07-discoverd-devices.png
 

Configuring On/Off Devices

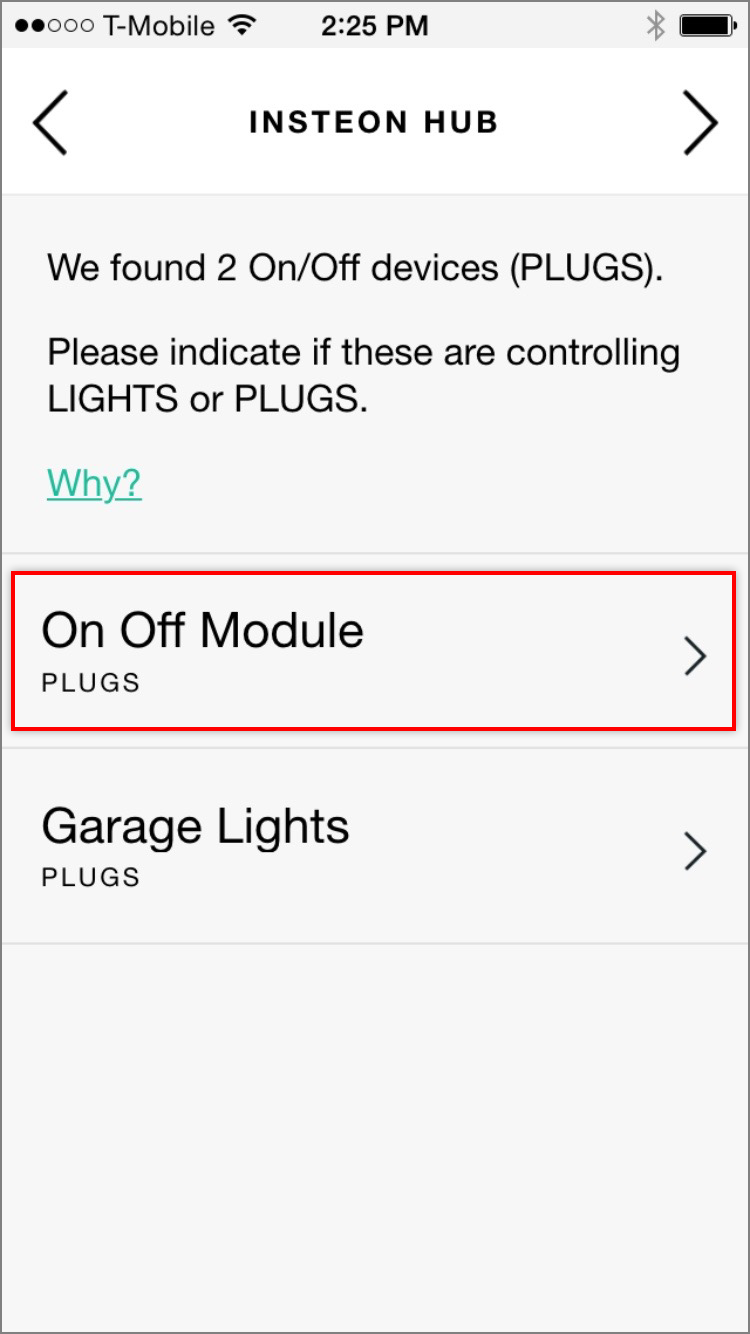
If your home includes On/Off devices like On/Off Outlet or On/Off Module, Harmony requires that you categorize the controlled device as either a Light or a Plug.

Step 1

To specify the type of controlled device, tap the device name.

on-off-01.png

Step 2

Tap Lights or Plugs to change the Harmony's categorization for that device.

on-off-2.png