Controlling a Sonos Player from an Insteon Device


To control Sonos functions or trigger presets from an Insteon device, create a scene for each desired function.


Create a Scene

Step 1

Open the Drawer and tap Create a Scene

tap-scene.png

Step 2

Give your scene a name that matches its intended function and pick an icon

name-and-icon.png

Step 3

From the Scene Members list of devices, tap the Insteon device or devices that you wish to use to control your Sonos Player.

With Keypads and Mini Remotes, select the corresponding button from the list of device buttons.

tap-keypad.png

Step 4

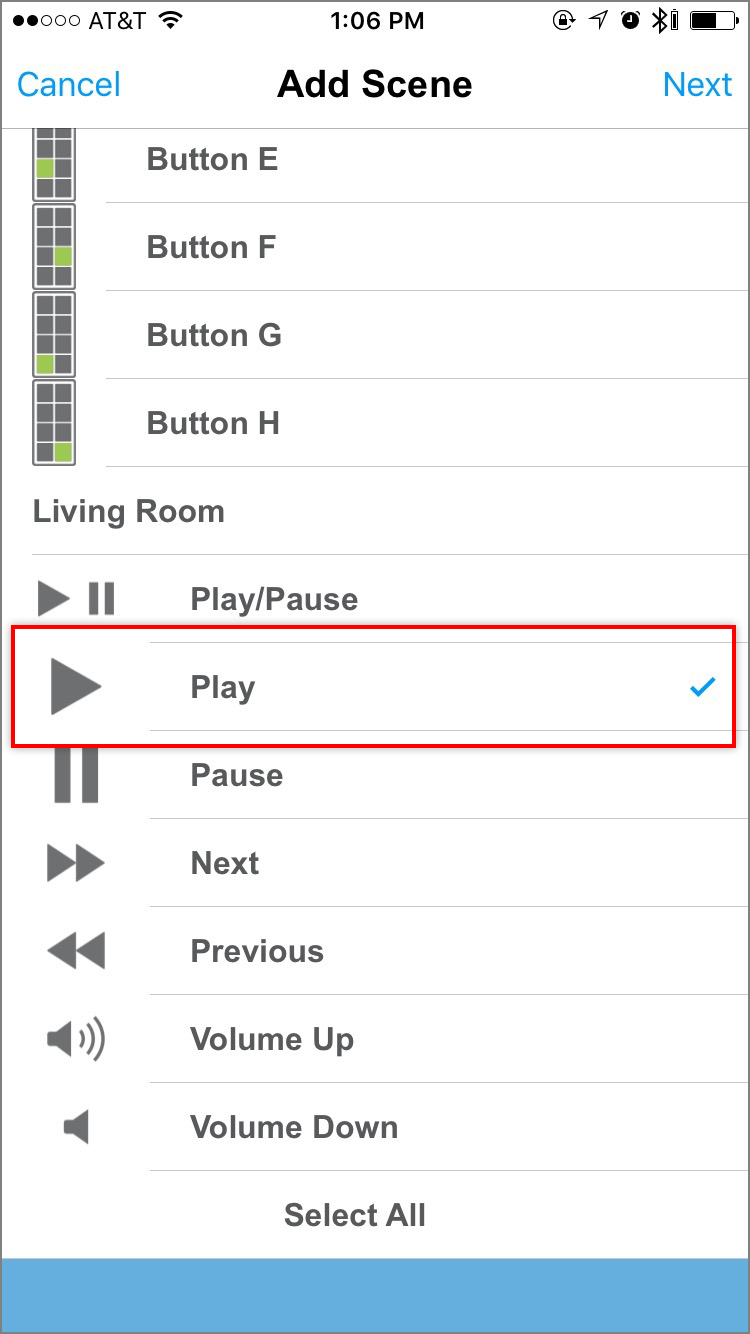
Tap the Sonos Player that you want to control

tap-sonos-function.png

Step 5

Tap the function you want to control and then tap Next

tap-sonos-function.png

Step 6

For each Insteon device, tap the blue Responder button until it reads "Both" and then tap Done.

Repeat the above steps for each additional Sonos Player function you wish to control.

tap-both.png
 

Additional Sonos Support


You Already Have the Maximum Number of Sonos Players Configured

When adding a Sonos Player, you may encounter a message informing you that you have already configured the maximum number of Sonos Players. Insteon Hub supports a maximum of four Sonos speakers.


No Music Playing when Learning a Sonos Preset

 
no-music-paying.png
 

When learning a preset with your Sonos Player, you may encounter an alert informing you that no music was heard while listening to your Sonos Player. For the Insteon app to remember your musical selection in a preset, music must be actively playing from your Sonos Player.

Basic Troubleshooting

  1. Tap the Home button on your mobile device
  2. Navigate to and open the Sonos app
  3. Select the desired music from any of the sources available.
  4. When music begins playing, tap the Home button and return to the Insteon app.
 

Connect to Wi-Fi When Adding a Sonos Player

 
connect-to-wifi.png
 

When adding a Sonos Player, you may encounter an alert informing you to connect to your home's Wi-Fi network.


Basic Troubleshooting

Connect your mobile device to your home's Wi-Fi network. You are unable to add a Sonos Player to the Insteon app when on a cellular 3G, 4G or LTE connection.


Connecting to Wi-FI on iPhone, iPad or iPod touch

  1. Tap the Home button on your iPhone, iPad or iPod touch and navigate to Settings.
  2. Tap Wi-Fi
  3. Ensure Wi-Fi is on and tap your home's Wi-Fi network. If you have more than one Wi-Fi router, it is important to join the same Wi-Fi network as that used by your Sonos Player.
  4. Tap the Home button on your iPhone, iPad or iPod touch and return to the Insteon app to complete your Sonos setup.
 

Connecting to Wi-Fi on an Android device

  1. Tap the home button on your Android device and navigate to Settings.
  2. Tap Wi-Fi
  3. Ensure that Wi-Fi is on and tap your home's Wi-Fi network. If you have more than one Wi-Fi router, it is important to join the same Wi-Fi network as that used by your Sonos Player.
  4. Tap the Home button on your Android device and return to the Insteon app to complete your Sonos setup.
 

Something Went Wrong While Configuring Your Camera


somethings-wrong.png
 

When configuring an Insteon Wi-Fi Camera, you may occasionally encounter a message informing you that something went wrong while configuring your camera and to ensure that the ethernet cable is connected. There are several reasons why this may occur.

  • Your Wi-Fi connection is offline

  • Your Wi-Fi Camera was unplugged from ethernet or power


Basic Troubleshooting

  1. Ensure that your Wi-Fi Camera is connected to a working power outlet and that the ethernet cable is firmly seated, even if you intend to use your camera with WI-Fi. It may be helpful to unplug and reinsert the ethernet cable.

  2. Try restarting your Insteon Wi-Fi Camera by unplugging its power cord. Wait about 30 seconds and then reconnect your camera to power.

  3. Ensure that your smartphone or tablet is connected to the same Wi-Fi Network as your Insteon Wi-Fi Camera.

  4. Confirm that your internet router and cable or DSL modem are connected to power and turned on. Learn how to identify your router and cable or DSL modem.

  5. Check that your Wi-Fi router is working by attempting to browse a website using another device or computer in your home.

  6. Try restarting your router and cable or DSL modem.


Something Went Wrong While Configuring the Camera Password


camera-password.png
 

When configuring an Insteon Wi-Fi Camera, you may occasionally encounter a message informing you that something went wrong while configuring the camera password. There are several reasons why this may occur.

  • The password was shorter than 1 character or longer than 12 characters

  • The password included characters other than numbers and letters

  • The password included spaces

The Insteon app should properly restrict entry of passwords such that they do not contain any unsupported or invalid characters. If you are unable to resolve the password following the restrictions above, you can tap Leave Blank to proceed without a camera password. After setup is complete, you can change the password from Edit Camera.


Changing the Camera Password from Edit Camera

Step 1

From Edit Camera, scroll down to Network Settings and tap Password

tap-password.png

Step 2

Replace the blank password with your desired camera password. Ensure your password meets the following criteria:

  • Between 1 and 12 characters long

  • Letters and numbers only

  • No spaces

  • Case sensitive

enter-password.png

Step 3

Tap Done

The Insteon app will update your camera's password and attempt to reconnect.

udpating.png
 

Basic Troubleshooting

If, after changing your camera's password, the Insteon app is unable to connect to your camera, attempt setup of your camera again.

  • Navigate to Edit Camera, scroll to the bottom and tap Delete Camera

  • Add a Device and choose Camera

  • In the list of cameras, your camera should appear as already configured

  • Enter the user name and new password chosen in step 2 above. If you receive an error informing you that the user name or password is incorrect, try using a blank password as it's possible the camera password was not updated.

  • If you are still unable to connect to your camera, follow the steps in this article to factory reset your camera and start again.


Something Went Wrong While Configuring the Camera User Name


camera-user-name.png
 

When configuring an Insteon Wi-Fi Camera, you may occasionally encounter a message informing you that something went wrong while configuring the camera user name. There are several reasons why this may occur.

  • The user name was shorter than 1 character or longer than 12 characters
  • The user name included characters other than numbers and letters
  • The user name included spaces

The Insteon app should properly restrict entry of user names such that they do not contain any unsupported or invalid characters. If you are unable to resolve the user name adhering to the restrictions above, you can tap Use Admin to use the default camera user name "admin" and complete setup. After setup is complete, you can change the user name from Edit Camera.


Changing the Camera User Name from Edit Camera

Step 1

From Edit Camera, scroll down to Network Settings and tap Username.

tap-username.png

Step 2

Replace admin with your desired camera user name. Ensure your user name meets the following criteria:

  • Between 1 and 12 characters long
  • Letters and numbers only
  • No spaces
  • Case sensitive
dannycam.png

Step 3

Tap Done

The Insteon app will update your camera's user name and attempt to reconnect.

tap-done.png
 

Basic Troubleshooting

If, after changing your camera's user name, the Insteon app is unable to connect to your camera, attempt setup of your camera again.

  • Navigate to Edit Camera, scroll to the bottom and tap Delete Camera.
  • Add a Device and choose Camera
  • In the list of cameras, your camera should appear as already configured.
  • Enter the new user name chosen in step 2 above. If you receive an error informing you that the user name or password is incorrect, try using the user name "admin" as it's possible the camera user name was not updated.
  • If you are still unable to connect to your camera, follow the steps in this article to factory reset your camera and start again.


Unable to Update or Read your Camera's Wi-Fi or Network Settings


When configuring an Insteon Wi-Fi Camera, you may encounter an alert informing you that the Insteon app was unable to update or read you camera's Wi-Fi or network settings. There are several reasons why this may occur.

  • Your camera may have become unplugged from ethernet or power

  • Your iPhone, iPad or iPod touch has been disconnected from your home's Wi-Fi network

  • Your home's internet router is not functioning properly.


Basic Troubleshooting

  1. Ensure that your Wi-Fi Camera is connected to a working power outlet and that the ethernet cable is firmly seated. It may be helpful to unplug and reinsert the ethernet cable.

  2. Confirm that your internet router is connected to power and turned on. Learn how to Identify your router and cable or DSL modem.

  3. Ensure that your smartphone or tablet is connected to Wi-Fi. For setup to complete, your smartphone or tablet must be connected to the same Wi-Fi network to which your Wi-Fi camera is physically connected.

  4. Try restarting your router.


Use Ethernet

If the Insteon app is unable to update your camera's Wi-Fi settings, you can elect to use ethernet instead of Wi-Fi. You can then use manually configure Wi-Fi settings using the camera's web interface. Once your camera is connected to your network using Wi-Fi, re-add the camera as an already-configured camera.


Leak Sensor Troubleshooting - Not Receiving Alerts


After adding your leak sensor to the Insteon for Hub app, you may occasional encounter a situation where you do not receive alerts. There are several reasons why this might occur.

  • Alerts are not enabled in the Insteon for Hub app
  • Your leak sensor is out of range
  • Your leak sensor battery is dead
  • Leak sensor has malfunctioned

To troubleshoot this issue, please try the following:

Confirm Leak Sensor and Hub are Communicating

Without moving the leak sensor from its current location, tap the set button on the device.

If the leak sensor blinks at all, you should have received an alert.

  • If no alert was received, confirm alerts are enabled for the leak sensor. See how to do this at the end of this article.
  • If you still did not receive and alert, move the leak sensor closer to the hub and try again. If the alert is received, the sensor is functional but out of range from the hub. A repeater is necessary.
  • If you still did not receive an alert, replace the battery in the leak sensor. If you still do not receive an alert, the leak sensor has failed and must be replaced.

If the leak sensor blinks once, pauses then blinks multiple times:

  • Leak sensor is functional but is unable to communicate to a linked device (hub or other receiver). Remove the leak sensor from the app, factory reset the leak sensor, then add to the app once again.
  • If you are not able to re-add the leak sensor to the app, move the sensor closer to the hub and try again. If adding to the hub succeeds, your leak sensor was out of range at its installed location and a repeater is necessary.
  • If you are still not able to add the leak sensor, the unit has failed and must be replaced.

If the leak sensor doesn’t blink:

  • Replace the battery and try again.
  • If the leak sensor still doesn’t blink, the device has failed and must be replaced.

Confirm Alerts are Enabled for iOS

  1. In the Insteon App, navigate to Settings
  2.  Tap Devices
  3.  Tap the desired device
  4.  Tap Alerts
  5.  Ensure that the switch for the desired alert is enabled then tap Message & Recipients
  6.  Ensure that the switch for Push Notification is enabled


Configure HD Wi-Fi Camera Network Settings


Your camera's network settings are automatically configured for you when you add an Insteon Wi-Fi Camera. If you would prefer to configure your camera prior to adding it to the Insteon app, use your camera's web browser interface.


You can configure the following settings from the Insteon app:

  • IP Address

  • HTTP Port

You can configure the following settings from the camera's web browser interface:

  • DHCP

  • IP Address

  • Subnet Mask

  • Gateway IP Address

  • Primary DNS Server

  • Secondary DNS Server

  • HTTP Port

  • HTTPS Port

  • ONVIF Port

If you have already added your camera to the Insteon app, you should remove it before you make your changes. After you have completed your changes, re-add the camera as an already-configured Wi-Fi camera.


Step 1

Using Camera Tool, locate your camera on your network. Double click your camera in the list to open its web browser interface.

Step 2

Enter your camera's user name and password and click Login when ready.

Step 3

Click Settings

Step 4

From the left sidebar, click Network and then IP Configuration.

Step 5

Configure your network settings as desired. When ready, click Save.

Step 6

From the left sidebar, click Port.

Step 7

Configure your port settings as desired. When ready, click Save.


Use Groups to Control Multiple Devices Simultaneously with Amazon Echo


If you want to control multiple Insteon lights and appliances with a single voice command or control Insteon devices alongside connected home devices from other manufacturers that are also supported by Amazon Echo, create groups in the Amazon Alexa app.


Add Groups to the Amazon Echo App

Step 1

Launch the Alexa app and tap the “Devices” button in the bottom right corner.

Step 2

Tap the “+” sign in the top right corner to add a device or a group.

Step 3

Tap Add Group

Step 4

Give your group a name and select the devices that you would like to include. When ready, tap Save.


Step 5

Choose the devices you would like to add to your group and then tap on “Save” at the bottom of the screen.

Step 5 (edit).png


Supported Insteon Devices with Amazon Alexa

While Amazon Alexa supports control of many Insteon devices, not all devices are supported, some devices may not support all features, and some of those features are accessible only through Insteon scenes. Use the table below to identify if your device is supported.

Amazon Alexa control requires Insteon Hub (2245-222).

Identify your model of Insteon Hub

 
Device Supported with Amazon Echo
Dimmer Module Supported
On/Off Module Supported
Outdoor On/Off Module Supported
LED Bulb (A19)

Supported

LED Bulb for Recessed Lights (PAR38)

Supported

Dimmer Switch Supported
Dimmer Switch (1000W) Supported
Dimmer Switch (2-Wire) Supported
On/Off Switch Supported
Dimmer Toggle Switch Supported
On/Off Toggle Switch Supported
Dimmer Keypad (6-Button) Controls connected light only - scene buttons are voice controllable through Insteon scenes
Dimmer Keypad (8-Button) Controls connected light only - scene buttons are voice controllable through Insteon scenes
On/Off Keypad (6-Button) Controls connected light only - scene buttons are voice controllable through Insteon scenes
On/Off Keypad (8-Button) Controls connected light only - scene buttons are voice controllable through Insteon scenes
Dimmer Outlet Supported
On/Off Outlet (2011) Supported
On/Off Outlet (2014) Controls top outlet only - bottom outlet is voice controllable through Insteon scenes
Wired Thermostat Temperature changes only. Not all revisions support control with Amazon Echo.
Wireless Thermostat -
Venstar Thermostat Adapter -
Ceiling Fan Controller Controls connected light when addressing device directly - fan speeds are voice controllable through Insteon scenes
Dimmer DIN Rail Module Supported
On/Off DIN Rail Module Supported
Dimmer Micro Module Supported
On/Off Micro Module Supported
Open/Close Micro Module -
0-10V Ballast Dimmer Supported
Dimmer In-Line Module Supported
On/Off In-Line Module Supported
220V Load Controller (Normally Open) -
220V Load Controller (Normally Closed) -
WiFi Cameras -
Open/Close Sensor -
Hidden Door Sensor -
Motion Sensor -
Leak Sensor -
Smoke Bridge -
IO Module -
Mini Remotes -
Door Lock and Deadbolt Controller -
IR Transmitter -
IR Receiver -
Serial Bridge -
iMeter Solo -
SynchroLinc -
 

Amazon Echo Didn't Control My Devices As Expected


When using Amazon Echo to control your Insteon lights and appliances, you may encounter a situation where Alexa does not perform the expected or desired action. There are several reasons why this may occur.

  • Your voiced command included contradictory operations

  • Amazon Echo misheard your request

  • Amazon Echo heard your request correctly but an issue communicating with Insteon prevented your lights or appliances from operating as expected


Contradictory Commands

When issuing commands to Amazon Echo, ensure that your statements do not include contradictions. Amazon Echo may not respond as expected if you request multiple differing operations (off and brighten, for example) in the same statement.

If the names of your Insteon lights and appliances include words like "on," "off," "bright," "dim," or "set," Amazon Echo may misinterpret the name of your device as your desired action for that device. To avoid this issue, rename your devices using the Insteon app and ask Amazon Echo to discover your devices.


Amazon Echo Misheard Your Request

You can view a transcript of your requests to Amazon Echo. If Echo has misunderstood your request, you can also provide feedback on what you had hoped would happen.

Step 1

Launch the Alexa app and tap the drawer button in the upper left corner

Step 1 (edit).png

Step 2

Tap Settings

Step 2 (edit).png

Step 3

Tap Account Settings

Step 3 (edit).png

Step 4

Tap History

Step 4 (edit).png

Step 5

This screen shows your Echo’s history. You can sort by Date Range and delete recordings. You can also provide feedback to help Alexa understand you better by clicking on the down arrow by one of your recordings.

Step 5 (edit).png

Step 6

If the transcription does not match your utterance, tap "No" under Did Alexa do what you wanted. If the transcription does match your utterance but the expected Insteon devices were not controlled, contact Insteon Support and reference this article. If necessary, Insteon Support will create a support ticket to investigate your issue.

Step 6.0 (edit).png
Step 6.1 (edit).png


Configure Port Forwarding on Apple Routers

Apple Routers use a tool called AirPort Utility for router configuration.

  1. Launch AirPort Utility from the Utilities folder from within Applications on your Mac. If you are on a PC and using an Apple router, be sure that AirPort Utility has been downloaded and installed from www.apple.com.
  2. There are two different versions of AirPort Utility.
 
airport-utility-6.png
 

AirPort Utility (5.x)

  1. Click on your AirPort Express or AirPort Extreme from the left sidebar.
  2. At the top of the window, click the Internet button.
  3. lick the DHCP button near the top of the window.
  4. Click the small “+” button beneath the DHCP Reservation section.
  5. Enter the following information on the DHCP Reservation Setup Assistant panel.
    • Description: Insteon Wi-Fi Camera
      If you have more than one Wi-Fi camera, use a name that is unique and descriptive of it's location in your home.
    • Reserve Address: MAC Address
  6. When finished, click Continue.
  7. Enter the following information on the next page of the DHCP Reservation Setup Assistant panel. You will need to pick an IP Address that is not already in use. We suggest something like 10.0.1.222. Make note of this address as you will need it later. You can find your Wi-Fi camera's MAC Address on the underside of the camera.
    • If your camera will be connected with an ethernet cable, enter the MAC Address from the larger label.
    • If your camera will be connected with Wi-Fi, enter the MAC Address from the smaller label. This label may also state "Wi-Fi MAC."
      • MAC Address: 00:AA:00:AA:00:AA
      • IPv4 Address: 10.0.1.222
    • When finished, click Done.
  8. Click the NAT button at the top of the window.
  9. Click the Configure Port Mappings button.
  10. Click the small “+” button beneath the Port Mappings section.
  11. Fill out the fields for your Wi-Fi Camera. The Public and Private TCP Ports should match the port displayed by your Camera. Leave the Service menu and UDP Ports blank. The Private IP Address is the one that you wrote down previously. When finished, click Continue.
  12. Enter the same description as that used in Step 5 and click Done.
  13. At the bottom of the configuration panel, click the Update button. Your router will restart. You should also restart your Wi-Fi Camera by disconnecting and reconnecting it to power.

To test your connection, turn off Wi-Fi on your smartphone and attempt to view your camera. If you can control and monitor your camera when not using Wi-Fi, then everything has been successfully configured. If not, something unforeseen may be complicating matters and we suggest that you contact Insteon Support for troubleshooting.


AirPort Utility (6.x)

  1. Click on your AirPort Express or AirPort Extreme.
  2. Click on the Edit button on the popup that appears.
  3. At the top of the panel that drops down, click the Network button.
  4. Click the small “+” button beneath the DHCP Reservation section.
  5. Fill out the fields for your Wi-Fi Camera. You will need to pick an IP Address that is not already in use. We suggest something like 10.0.1.222. Make note of this address as you will need it later. You can find your Wi-Fi Camera's MAC Address on the bottom of the camera.
    • Description: Insteon Wi-Fi Camera
      • If you have more than one Wi-Fi camera, use a name that is unique and descriptive of it's location in your home.
    • Reserve Address: MAC Address
    • MAC Address: 00:AA:00:AA:00:AA
    • IPv4 Address: 10.0.1.222
      • If your camera will be connected with an ethernet cable, enter the MAC Address from the larger label.
        • If your camera will be connected with Wi-Fi, enter the MAC Address from the smaller label. This label may also state "Wi-Fi MAC."
    • When finis hed, click Save.
  6. Click the small “+” button beneath the Port Settings section.
  7. Fill out the fields for your Wi-Fi Camera. The Public and Private TCP Ports should match the port displayed by your Camera. Leave the UDP Ports blank. The Private IP Address is the one that you wrote down in the previous step.
  8. When finished, click Save.
  9. At the bottom of the configuration panel, click the Update button. Your router will restart. You should also restart your camera by disconnecting and reconnecting it to power.

To test your connection, turn off Wi-Fi on your smartphone and attempt to view your camera. If you can control and monitor your camera when not using Wi-Fi, then everything has been successfully configured. If not, something unforeseen may be complicating matters and we suggest that you contact Insteon Support for troubleshooting.