Download the App
The ControLinc Label Template software requires a PC running Windows. The ControLinc Label Template software is not compatible with Mac OS X.

The ControLinc Label Template software requires a PC running Windows. The ControLinc Label Template software is not compatible with Mac OS X.
With Insteon Hub (2245-222) and Harmony Ultimate Home, Harmony Home Control or Harmony Home Hub, you can integrate your Insteon-controlled lights and appliances with your home entertainment system.
Step 1
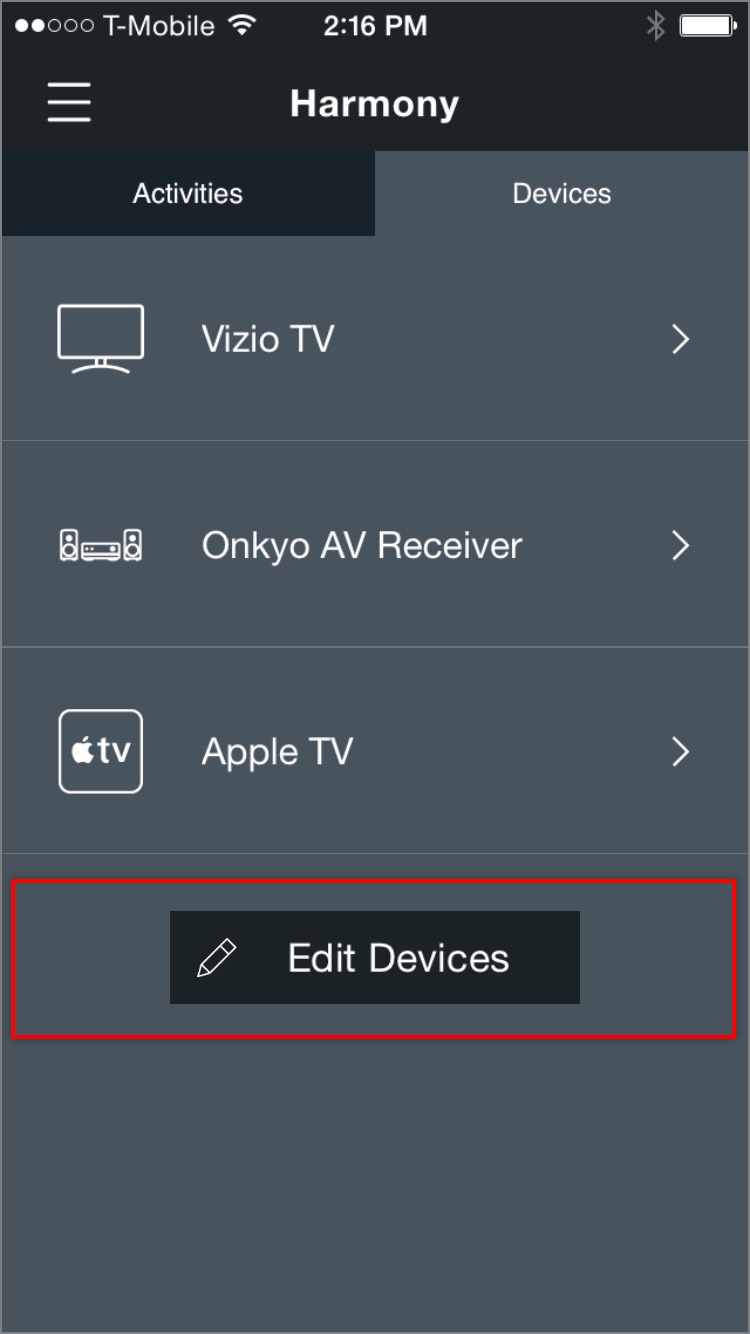
Launch the Harmony app on your smartphone and navigate to Devices. Tap the Edit Devices button.
Step 2
Tap the + Device button.

Step 3
Tap Home Control

Step 4
Tap Insteon Hub

Step 5
To connect your Insteon Hub to your Harmony Hub, you will need to enter your Insteon account information. Tap Sign In.

Step 6
Enter your Insteon account user name and password.

Step 7
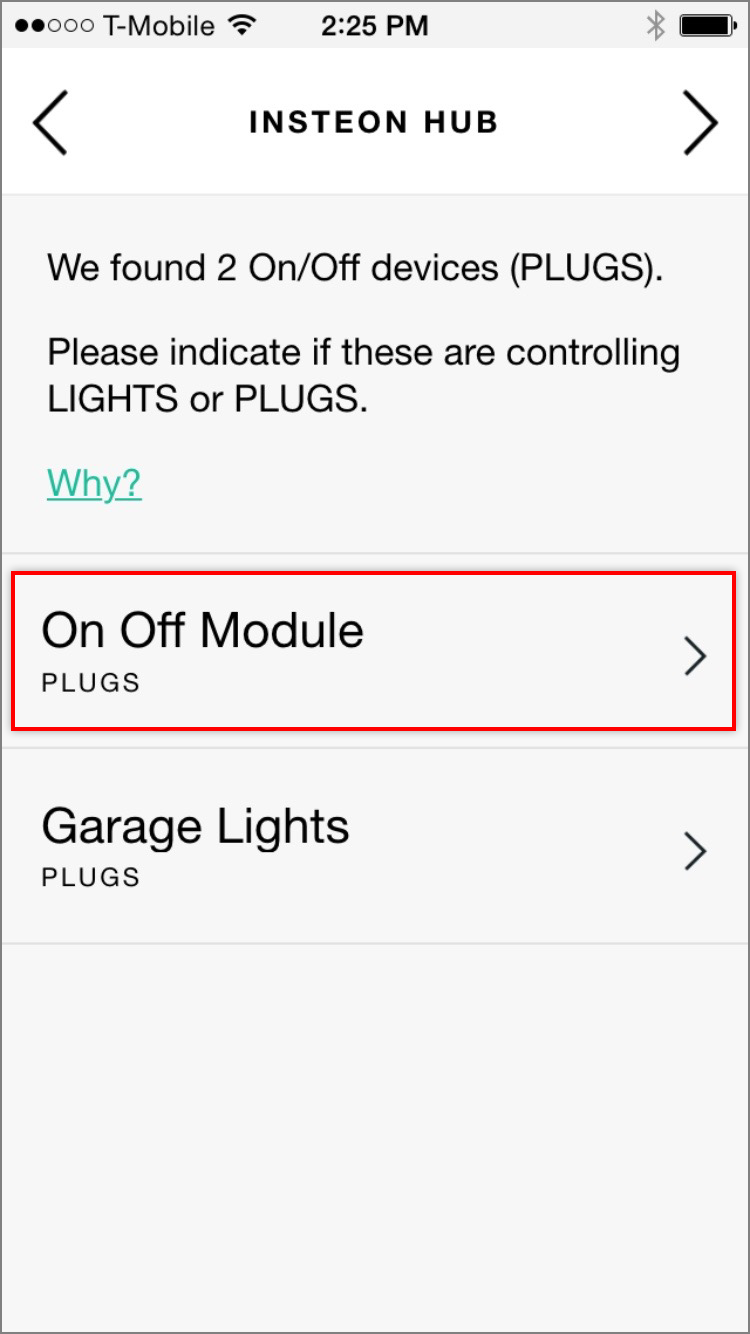
After a few moments, you will see a list of supported Insteon devices that can be used in Harmony activities.

If your home includes On/Off devices like On/Off Outlet or On/Off Module, Harmony requires that you categorize the controlled device as either a Light or a Plug.
Step 1
To specify the type of controlled device, tap the device name.
Step 2
Tap Lights or Plugs to change the Harmony's categorization for that device.

With Insteon Hub (2245-222) and Harmony Ultimate Home Control or Harmony Home Hub, you can control Insteon lights and appliances directly from your remote control using the Home Control buttons.
Step 1
From the Harmony app, open the settings drawer
Step 2
Tap Harmony Setup
Step 3
Tap Add/Edit Devices & Activities
Step 4
From the Settings screen, scroll down and select Remote & Hub
Step 5
Tap Harmony Home Control Button Customization
Step 6
Tap Home Control Buttons
Step 7
Tap the button for which you would like to assign an Insteon device and then tap the Assign button to chose an Insteon light or appliance.
Repeat these steps for the four Home Control buttons and, when finished, tap the next arrow.
After you have added Insteon Hub to your Harmony Home Ultimate, Harmony Home Control or Harmony Home Hub, you can add Insteon devices to your Harmony Activities.
Insteon devices can be added when you create a new Harmony activity or added to an existing activity. These instructions show you how to add Insteon devices to an existing Harmony activity.
Step 1
From the Activities tab in the Harmony app, tap Edit Activities.
Step 2
Tap the activity for which you would like to add Insteon devices.
Step 3
On the Activity Summary screen, scroll down and tap Re-Run Activity.
Step 4
Tap the checkbox for each Insteon device that you would like to include.
Step 5
Follow the on-screen instructions to move through the setup wizard until you reach Adjusting Devices.
Tap the checkbox for each device that you would like to include when your activity starts.
Step 6
Adjust the devices to their desired states, making sure to tap the power symbol if you want the light or appliance on. To brighten or dim a light, drag the vertical black line between low and high.
Step 7
You can chose when Harmony will control these devices by tapping the When to Adjust button.
Step 8
Tap the next arrow and repeat the adjustment steps for when your activity ends. When finished, tap the next arrow to save your changes and complete setup.
You may occasionally encounter a message informing you that Harmony Hub couldn't find any supported devices in your Insteon Hub account. There are several reasons why this might occur.
Step 1
Tap Refresh / Re-Login

Step 2
Wait while Harmony Hub discovers your Insteon devices. If Harmony still doesn't discover any devices, try removing and re-adding Insteon Hub from the Harmony app.

While Logitech Harmony Home supports control and monitoring of many Insteon devices, not all devices are supported and some devices may not support all features. Use the table below to identify if your device is supported.
Logitech Harmony Home requires Insteon Hub (2245-222).
| Device | Supported in Harmony |
|---|---|
| Dimmer Module | |
| On/Off Module | |
| Outdoor On/Off Module | |
| LED Bulb (A19) |
|
| LED Bulb for Recessed Lights (PAR38) |
|
| Dimmer Switch | |
| Dimmer Switch (1000W) | |
| Dimmer Switch (2-Wire) | |
| On/Off Switch | |
| Dimmer Toggle Switch | |
| On/Off Toggle Switch | |
| Dimmer Keypad (6-Button) | Controls connected light only |
| Dimmer Keypad (8-Button) | Controls connected light only |
| On/Off Keypad (6-Button) | Controls connected light only |
| On/Off Keypad (8-Button) | Controls connected light only |
| Dimmer Outlet | |
| On/Off Outlet (2011) | |
| On/Off Outlet (2014) | Controls top outlet only |
| Wired Thermostat | - |
| Wireless Thermostat | - |
| Venstar Thermostat Adapter | - |
| Ceiling Fan Controller | Controls connected light only |
| Dimmer DIN Rail Module | |
| On/Off DIN Rail Module | |
| Dimmer Micro Module | |
| On/Off Micro Module | |
| Open/Close Micro Module | - |
| 0-10V Ballast Dimmer | |
| Dimmer In-Line Module | |
| On/Off In-Line Module | |
| 220V Load Controller (Normally Open) | - |
| 220V Load Controller (Normally Closed) | - |
| WiFi Cameras | - |
| Open/Close Sensor | Monitoring only. Not currently supported as an activity trigger. |
| Hidden Door Sensor | Monitoring only. Not currently supported as an activity trigger. |
| Motion Sensor | Monitoring only. Not currently supported as an activity trigger. |
| Leak Sensor | Monitoring only. Not currently supported as an activity trigger. |
| Smoke Bridge | - |
| IO Module | - |
| Mini Remotes | - |
| Door Lock and Deadbolt Controller | - |
| IR Transmitter | - |
| IR Receiever | - |
| Serial Bridge | - |
| iMeter Solo | - |
| SynchroLinc | - |

You may occasionally encounter an alert informing you that your account user name or password is incorrect during initial Insteon Hub setup. There are several reasons why this might occur.
If you encounter this message while attempting to add an Insteon Hub for the first time, please contact Insteon support and reference this article.
If you encounter this message while attempting to add a second Insteon Hub, try signing out of the Insteon app and then begin the add process again. If you still encounter this message, please contact Insteon support and reference this article.

When setting up an Insteon Hub (2014) for the first time, you may encounter an alert informing you to connect to your home's WiFi network and scan the QR code again. This alert will appear for Insteon Hubs with firmware versions 1005 and prior.
Step 1
Tap the Home button on your iPhone, iPad or iPod touch and navigate to settings.
Step 2
Tap WiFI
Step 3
Ensure WiFi is on and tap your home's WiFi network.
If you have more than one WiFi router, it is important to join the WiFi network created by the router into which your Insteon Hub is connected. Learn more about identifying your home's WiFi router.
Step 4
Tap the Home button on your iPhone, iPad or iPod touch and return to the Insteon app.
With Insteon+ and Hub Pro, you can control both Insteon-native devices as well as HomeKit-compatible devices. Follow these steps to add an Insteon device to Insteon+ using the set button.
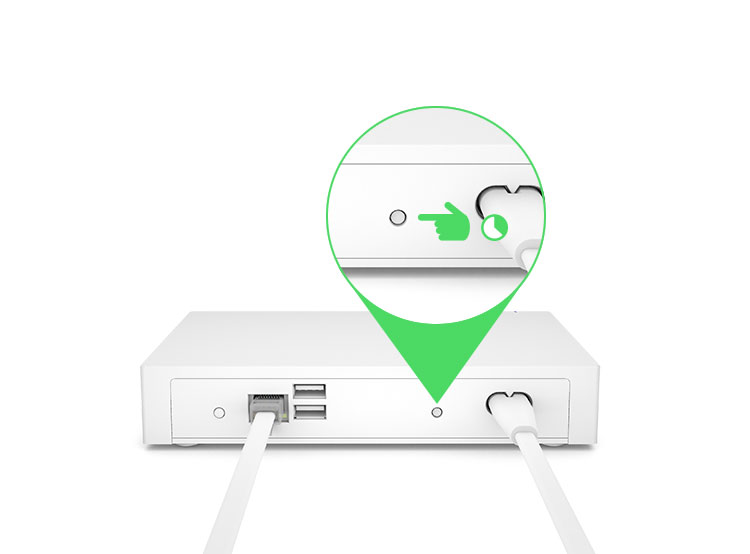
1. Press and hold the set button on the back of Hub Pro until Hub Pro beeps.

2. Press and hold the set button on your Insteon device until it double beeps or its LED begins blinking. If adding Insteon bulbs, remove power and re-apply power. Bulbs will enter linking mode on power up.

3. Repeat the process in reverse, starting with the new Insteon device.

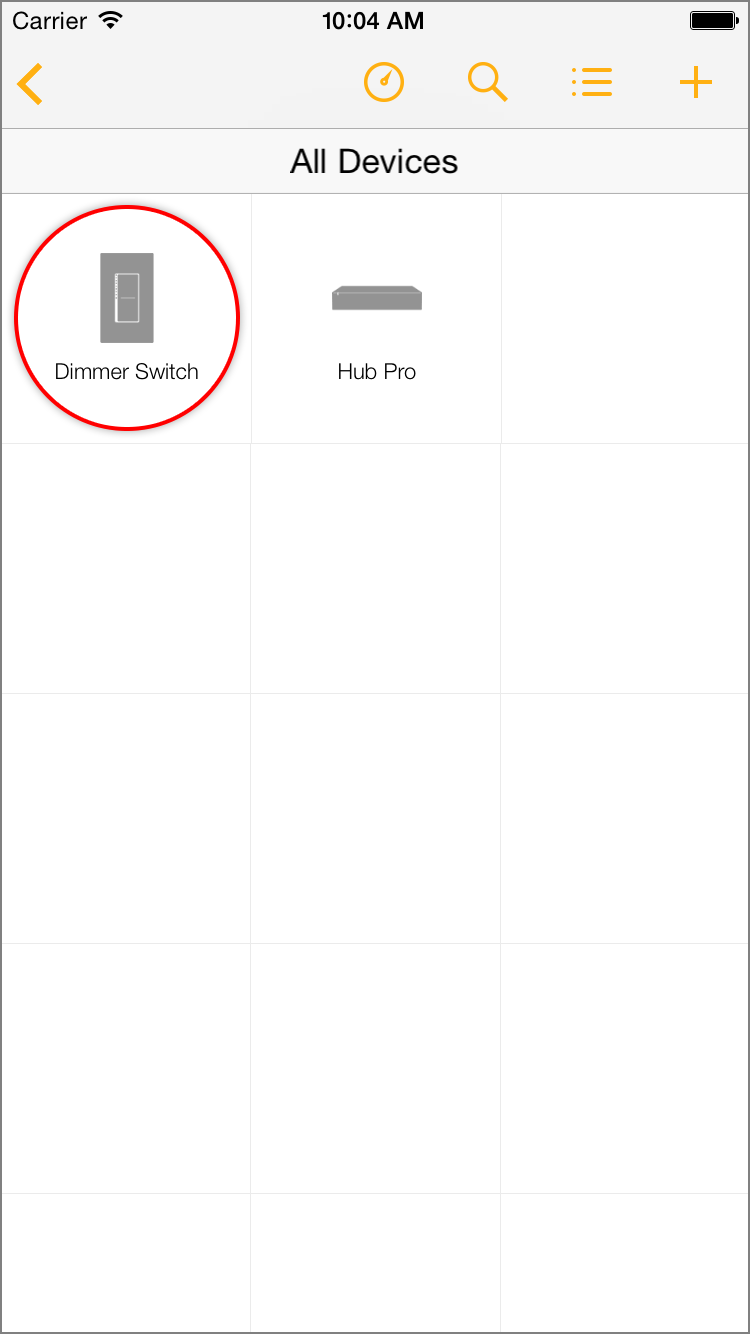
4. Navigate to All Devices. Your new Insteon device should appear with a generic icon and name. If your device does not appear, force-close the Insteon+ app and restart.
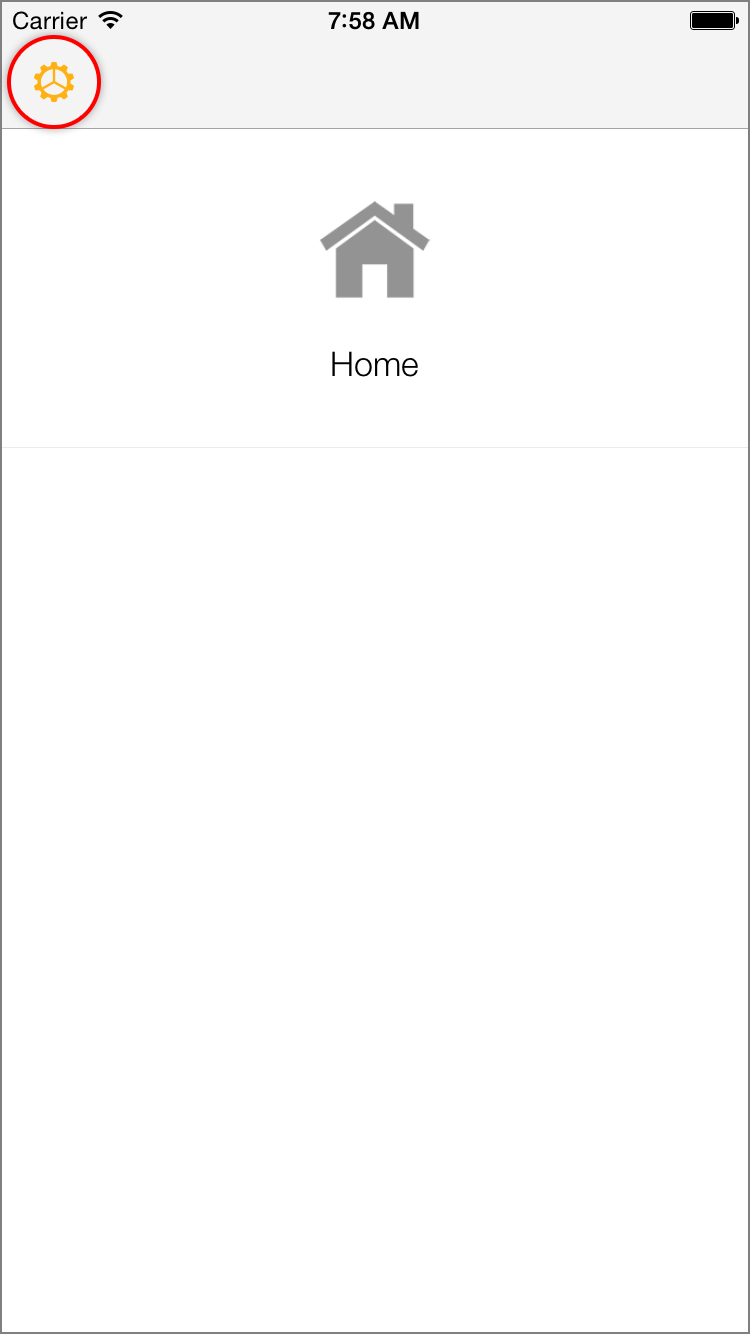
5. Tap the Configure button in the upper right corner to open the Configure your Home sheet.

6. Tap Edit Devices.

7. Select your new Insteon device from the list of devices.

8. Finish up by giving your device a name and selecting an icon.

If a device has stopped functioning or if you are replacing an older device with a newer device, you can remove it from Insteon+. Follow the steps in this article to remove an Insteon device from Insteon+. Removing a device will also remove it from any room, schedules and scenes and cannot be undone.
1. Press and hold the set button on the back of Hub Pro until Hub Pro beeps. Press and hold the set button on the back of Hub Pro until Hub Pro beeps again.
2. Press and hold the set button on your old Insteon device until it double beeps.

3. Repeat the process in reverse, starting with your old Insteon device. After several moments, the Insteon device will disappear from Insteon+.
If you have followed the steps to remove an Insteon device from Insteon+ but the removed device continues to show and no longer responds, try the troubleshooting steps below.
1. Navigate to Homes and tap Settings
2. Tap Sign Out

1. With Insteon+ open on your iPhone, iPad or iPod touch, press and hold the power button until Slide to Power Off appears.

2. Release the power button and press and hold the Home button until Insteon+ disappears.

Follow the instructions in this article to update the System Firmware and Application Firmware on your Insteon HD WiFi Camera. The steps in this article apply to Insteon HD WiFi Camera and Insteon Outdoor HD WiFi Camera. For instructions on how to update your SD WiFi Camera firmware, see Update your SD WiFi Camera System Firmware.
Follow the instructions in Identify your WiFi Camera Firmware Version to determine if your WiFi Camera requires updating.
1. Download the most current firmware for your Insteon HD WiFi Camera or Insteon HD Outdoor WiFi Camera
2. Open the IP Camera tool and wait for it to identify the Insteon WiFi Camera that you wish to update.
3. When the desired Camera appears, double-click to select it in the list. This should launch your computer’s default web browser and take you to a login page for the camera.
4. Enter your Camera’s user name and password. If you never changed the user name or password, the default user name is “admin” and the default password is blank.
5. Click Login
6. Click the Settings tab at the top of the window
7. In the left sidebar, click System
8. Click Back-up & Restore
9. Click the Backup button. A file will download to your computer named configs.bin. This file contains all of the settings and configuration for your camera and will be used to restore your preferences after the firmware update.
10. Click System Upgrade
11. Click the Choose File button and select the firmware file downloaded from insteon.com at the beginning of these instructions.
12. Click the System Upgrade button. The upgrade process will take about 3 minutes during which time your camera will restart. Do not unplug your camera or refresh your browser during this time. When the upgrade is complete, your browser will refresh automatically.
13. If presented with a Login window, enter your camera’s user name and password and click Login
14. Click the Settings tab
15. In the left sidebar, click Status
16. Click Device Information
17. Confirm that the version displayed in the System Firmware Version matches the updated system firmware
The web user interface is updated separately from the camera system firmware but the steps are identical.
1. In the left sidebar, click System
2. Click System Upgrade
3. Click the Choose File button and select the user interface file downloaded from insteon.com at the beginning of these instructions.
4. Click the System Upgrade button. The upgrade process will take about 3 minutes during which time your camera will restart. Do not unplug your camera or refresh your browser during this time. When the upgrade is complete, your browser will refresh automatically.
5. If presented with a Login window, enter your camera’s user name and password and click Login
6. Click the Settings tab
7. In the left sidebar, click Status
8. Click Device Information
9. Confirm that the version displayed in Application Firmware Version matches the updated application firmware
1. In the left sidebar, click System
2. Click Back-up & Restore
3. Click the Choose File button and select the configs.bin file that was downloaded to your computer previously
4. Click the Submit button. The restore process will take about 1 minute during which time your camera will restart. Do not unplug your camera or refresh your browser during this time. When the restore is complete, your browser will refresh automatically.
Use this article to properly identify the System Firmware and Application Firmware version on Insteon HD WiFi Camera or the Device Firmware and Device Web UI version on Insteon SD WiFi Camera.
1. Ensure that your Insteon WiFi Camera is powered on and connected to your network. If your camera has not yet been configured, connect your camera to power and to your router using the provided ethernet cable.
2. Download and install the IP Camera Tool
3. Open the IP Camera Tool; it may take several moments to find the WiFi Camera on your network.
4. For the desired camera, right-click on a PC or control-click on a Mac and select Basic Properties
5. Check the Firmware Version displayed against the current System Firmware version available. Check the Web UI Version against the current Application Firmware version available.

Notice: If you are receiving the following HSC-1-0 error message when attempting to add the hub, cancel out of setup, force-close the app and restart. Then attempt to log back in and add hub again. We are working on a fix to resolve this issue. Thank you for your patience.

When initially setting up your Insteon Hub, you may encounter an alert informing you that the app was unable to establish a connection to the Insteon Hub. There are several reasons why this may occur.
Your home's internet connection is offline
Your home's internet router or modem is not functioning properly
Insteon Hub may have become unplugged from ethernet or power
Ensure that your Insteon Hub is connected to a working power outlet and that the ethernet cable is firmly seated. It may be helpful to unplug and reinsert the ethernet cable. If your Hub shows a solid red status LED, your Hub is unable to connect to the internet.
Confirm that your internet router and cable or DSL modem are connected to power and turned on. Learn how to Identify your router and cable or DSL modem.
Check that your internet connection is working by attempting to browse to a website using another device or computer in your home.
With Insteon Hub (2012), ensure that your smartphone or tablet is connected to the same WiFi network as your Insteon Hub.
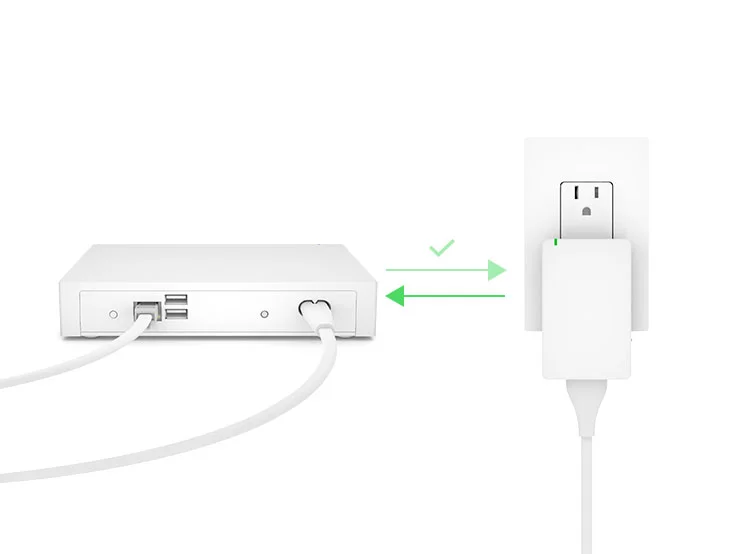
Try restarting your Insteon Hub by unplugging its power cord. Wait about 30 seconds and then reconnect your Hub to power.
Try restarting your router and cable or DSL modem.
If none of the above steps resolved your issue, follow the steps outlined in this article to perform a network reset.

To setup and configure Insteon Hub (2012), connect your Insteon Hub to your router using the provided ethernet cable and power using the provided power cable.
You must be connected to the same WiFi network as your Insteon Hub.
If you have more than one WiFi router in your home, connect your Insteon Hub to the WiFi Router broadcasting the WiFi network that you regularly use.
If you are unsure which router broadcasts the WiFi network that you regularly use, try the following:
Unplug all of your routers from power
One at a time, connect a router to power and wait about 60 seconds
Check to see if your WiFi network is available from your device's settings
If nothing appears, unplug the just-connected router and try the next router
Download and install the Insteon app from your device's app store.
Create an account.
When asked to scan the label on the bottom of your Hub, tap Help.
Tap My Hub Doesn't Have a QR Code.
The Insteon App should find your Hub and complete setup.
After setup is complete, you may need to connect your Insteon Hub to a different router to configure port forwarding if you would like to control and monitor your home when you are away.
To setup and configure Insteon Hub (2014), connect your Insteon Hub to your router using the provided ethernet cable and power using the provided power cable.
After about 30 seconds, you should hear a single beep and the status LED will glow solid green. If the status LED turns red, your Hub is not connected to the internet.
Download and install the Insteon app from your device's app store.
Create an account.
When asked to scan the label on the bottom of your Hub, align the QR Code displayed on screen with the QR Code printed on the bottom of the Hub. The Insteon app should find your Hub and complete setup.

When setting up an Insteon Hub, you may encounter an alert informing you that your Insteon Hub has already been configured with a different account. There are several reasons why this may occur.
You have more than one Insteon account and are attempting to setup your Insteon Hub using a different account than the one originally used to configure it.
You have created a new Insteon account and are attempting to setup your Insteon Hub that is still associated with your old account.
If you have purchased Insteon Hub from another Insteon user, their account may still be associated to the Insteon Hub.
Before you can setup your Insteon Hub with a different account, you must first delete your account using the Insteon App.
On iOS, launch the Insteon App and open the drawer by swiping from the right of the display, then tap Settings.
On Android, tap Settings > Edit This.
On Windows Phone, swipe through the carousel until you reach Settings.
Tap Account
Tap Delete Account
If you are unable to sign in to the Insteon App, contact Insteon Support and they can help reset access to your Insteon Hub. Be sure to have your Hub's Insteon ID. You can find the Insteon ID on the bottom of the Hub.