Issue: Not able to configure email settings and/or not able to get a successful e-mail test on your Insteon IP Camera
Solution: Please see below for common SMTP Settings. (Note, while these settings work for most users, you may need to contact your email provider for you specific settings)
Aol:
smtp server: smtp.aol.com
smtp port: 587
Transport layer security: starttls
Apple/iCloud/Me:
smtp server: smtp.mail.me.com
smtp port: 587
Transport layer security: starttls
AT&T/SBC Global:
smtp server: smtp.att.yahoo.com
smtp port: 465
Transport layer security: tls
Comcast:
smtp server: smtp.comcast.net
smtp port: 465
Transport layer security: tls
Gmail:
smtp server: smtp.gmail.com
smtp port: 587
Transport layer security: starttls
Hotmail/MSN/Outlook/Live:
smtp server: smtp.live.com
smtp port: 587
Transport layer security: starttls
RoadRunner:
smtp server: smtp-server.<location>.rr.com
smtp port: 587
Transport layer security: starttls
Time Warner:
smtp server: mail.twc.com
smtp port: 587
Transport layer security: starttls
Verizon:
smtp server: smtp.verizon.net
smtp port: 587
Transport layer security: starttls
Yahool:
smtp server: smtp.mail.yahoo.com
smtp port: 465
Transport layer security: tls
Insteon Camera - invalid params
Symptoms
The Insteon Camera is generating the following error anytime you attempt to save any changes:
invalid params
Causes
The error is cause by invalid characters in the Username or Password of the camera
! @ # $ % ^ & * ( ) - +
Resolution
You will need to factory reset the camera and begin setup from the beginning. You are not able to change the username or password in the camera, as the existing login information is invalid.
Indoor Camera Factory Rest Steps:
Step 1: On the bottom of the camera locate the hole in the bottom of the camera marked RESET.
Step 2: Using a paperclip or similar object to press an hold the RESET button for 30 seconds.
Step 3: The camera will start to pan and tilt within 30 seconds of the reset.
Step 4 Wait 90 seconds before beginning again.
Outdoor Camera Factory Reset Steps:
Step 1: On the cable bundle, locate the reset button
Step 2: Press and hold the reset button for 30 seconds then let go.
Step 4: Wait 90 seconds before beginning again.
Insteon SD WiFi Camera Setup Videos
The links below will take you to specific video tutorials that will help you set up your new SD Insteon wireless IP camera.
Optional Camera steps:
The steps shown in these videos will work for either the Indoor Wireless IP Camera or the Outdoor Wireless IP Camera.
If you are not using your Insteon camera with the Insteon Hub, we recommend the following third party apps:
iOS - CamViewer, Foscam Pro, Live Cams Pro, OWLR
Android - IP CamViewer, TinyCam Monitor, NetEye Camera, OWLR
Windows Phone - IP Cam Controller
Setting Up Alert Emails for HD Cameras
Setting Up Alert Emails for HD Cameras
This Guide assumes you have completed the initial camera setup. In the pictured examples we will be using Internet Explorer. If you are using Chrome, FireFox or Safari your screen may be lacking the Playback tab.
Step 1: Mail Settings
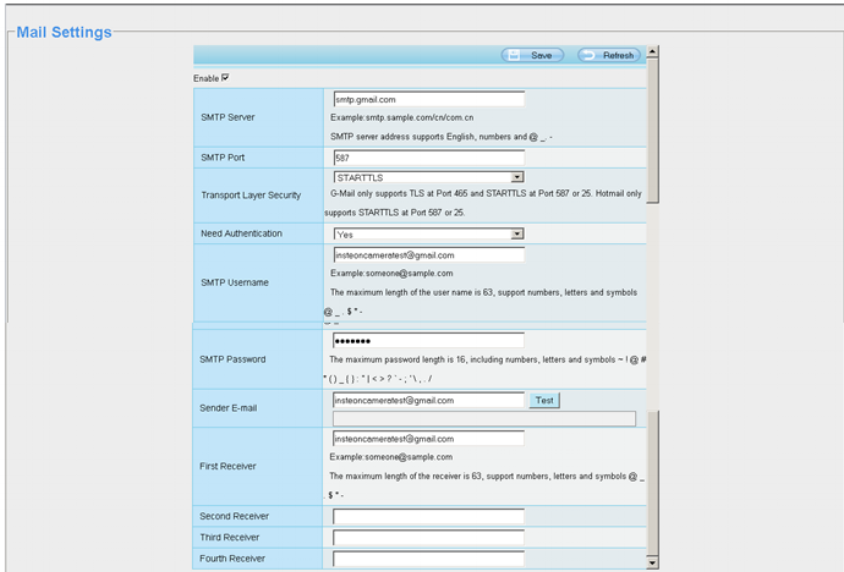
Log into the camera via its local IP addresses and select your browser of choice. Then select Settings. On the left navigation bar you will select Network, then Mail Settings.
The information will change depending on your provider, so you may need to contact them for additional information. In the provided example we have set up the account using a Gmail address.
Gmail’s SMTP server parameters are as follows.
SMTP Server: smtp.gmail.com
SMTP Port: 587
Transport Layer Security: STARTTLS
Need Authentication: Yes
SMTP User: username@gmail.com
SMTP Password: Your Account Password
Sender Email will be the same as your SMTP Username.
Once completed hit Test and it should say Success.
If you get a failed message due to incorrect username or password, you may need to update you settings with Google to allow external device access. You will need to update this with Google directly.
Once you get the success, hit save at the top of the screen.
Step 2: Enabling Motion Detection
Navigate to Alarm>Motion Detection and check Enable.
Generally you will want to keep the selectivity at medium to prevent false alerts.
The Triggered Interval will allow you to set up the “rest period” between alerts. Meaning it will wait X time before it reports the next motion.
You will need to check Send Email.
For the HD Cameras you will need to enable the schedule for motion detection to operate. In the example below we have enabled the alarm from 10am to 6pm (1800 Hours) Monday through Friday.

You can also set your Detection Area. By default this is set for all, however in the example below, it will only record motion in front of the cabinet, but not people walking through the background.

Step 3: Test
Once the camera detects motion within the specified time-frame and zone, you should receive an email with 3 screen shots.
Garage Door Status settings for Hub (iOS)
Please see the pictures below for the general settings for the Garage Door Status kit on your Apple iOS device:
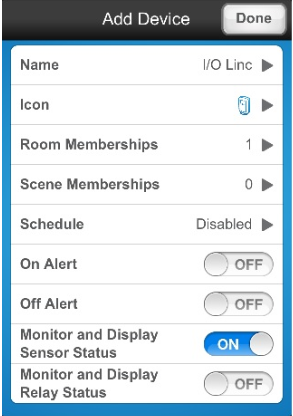
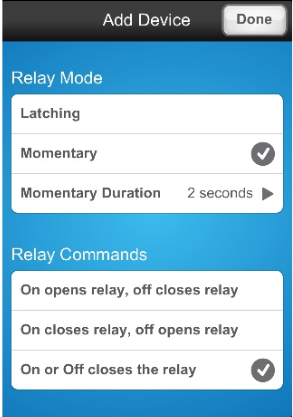

Do not forget to tap on "Done" at the top right of the screen to save your settings.
Removing a House from your Hub App (iOS)
Removing a second house from your Insteon for Hub Application (iOS)
Description Multiple Hubs have been added to the same account but now one needs to be removed.
Solution: If you are still able to login to your Insteon for Hub account follow the steps below to remove the unwanted Hub. If you no longer have access to the account you will need to contact Insteon support so that they can delete the entire account.
Step 1: On your iOS device, login to your Insteon for Hub application

Step 2: Navigate to the "Settings" page.

Step 3: Tap on "House Management"

Step 4: Make sure that you are logged into the Hub you are keeping.

Step 5: On the Hub that you wish to remove, swipe from right to left to reveal a red "Delete" button. Tap on the "Delete" button to remove the Hub.

Diagnostic Keypad - Owner's Manual

Diagnostic Keypad Setup

Noise Filter - Quick Start Guide

Noise Filter Setup
Guides and Manuals
Quick Start Guide
Featured

Owner's Manual
Featured

Phase Coupler Setup

SynchroLinc Setup
Guides and Manuals
Quick Start Guide
Featured

Owner's Manual
Featured

IR Receiver Setup
Guides and Manuals
Quick Start Guide
Featured

Owner's Manual
Featured

IR Transmitter Setup
Guides and Manuals
Quick Start Guide
Featured

Owner's Manual
Featured

Range Extender Setup
Guides and Manuals
Quick Start Guide
Featured

Owner's Manual
Featured

Discontinued Products
Looking for a product that isn't listed? Try searching all documentation.
Featured


Get Started with Everything Else

Lock Controller Setup
Guides and Manuals
Quick Start Guide
Featured

Owner's Manual
Featured

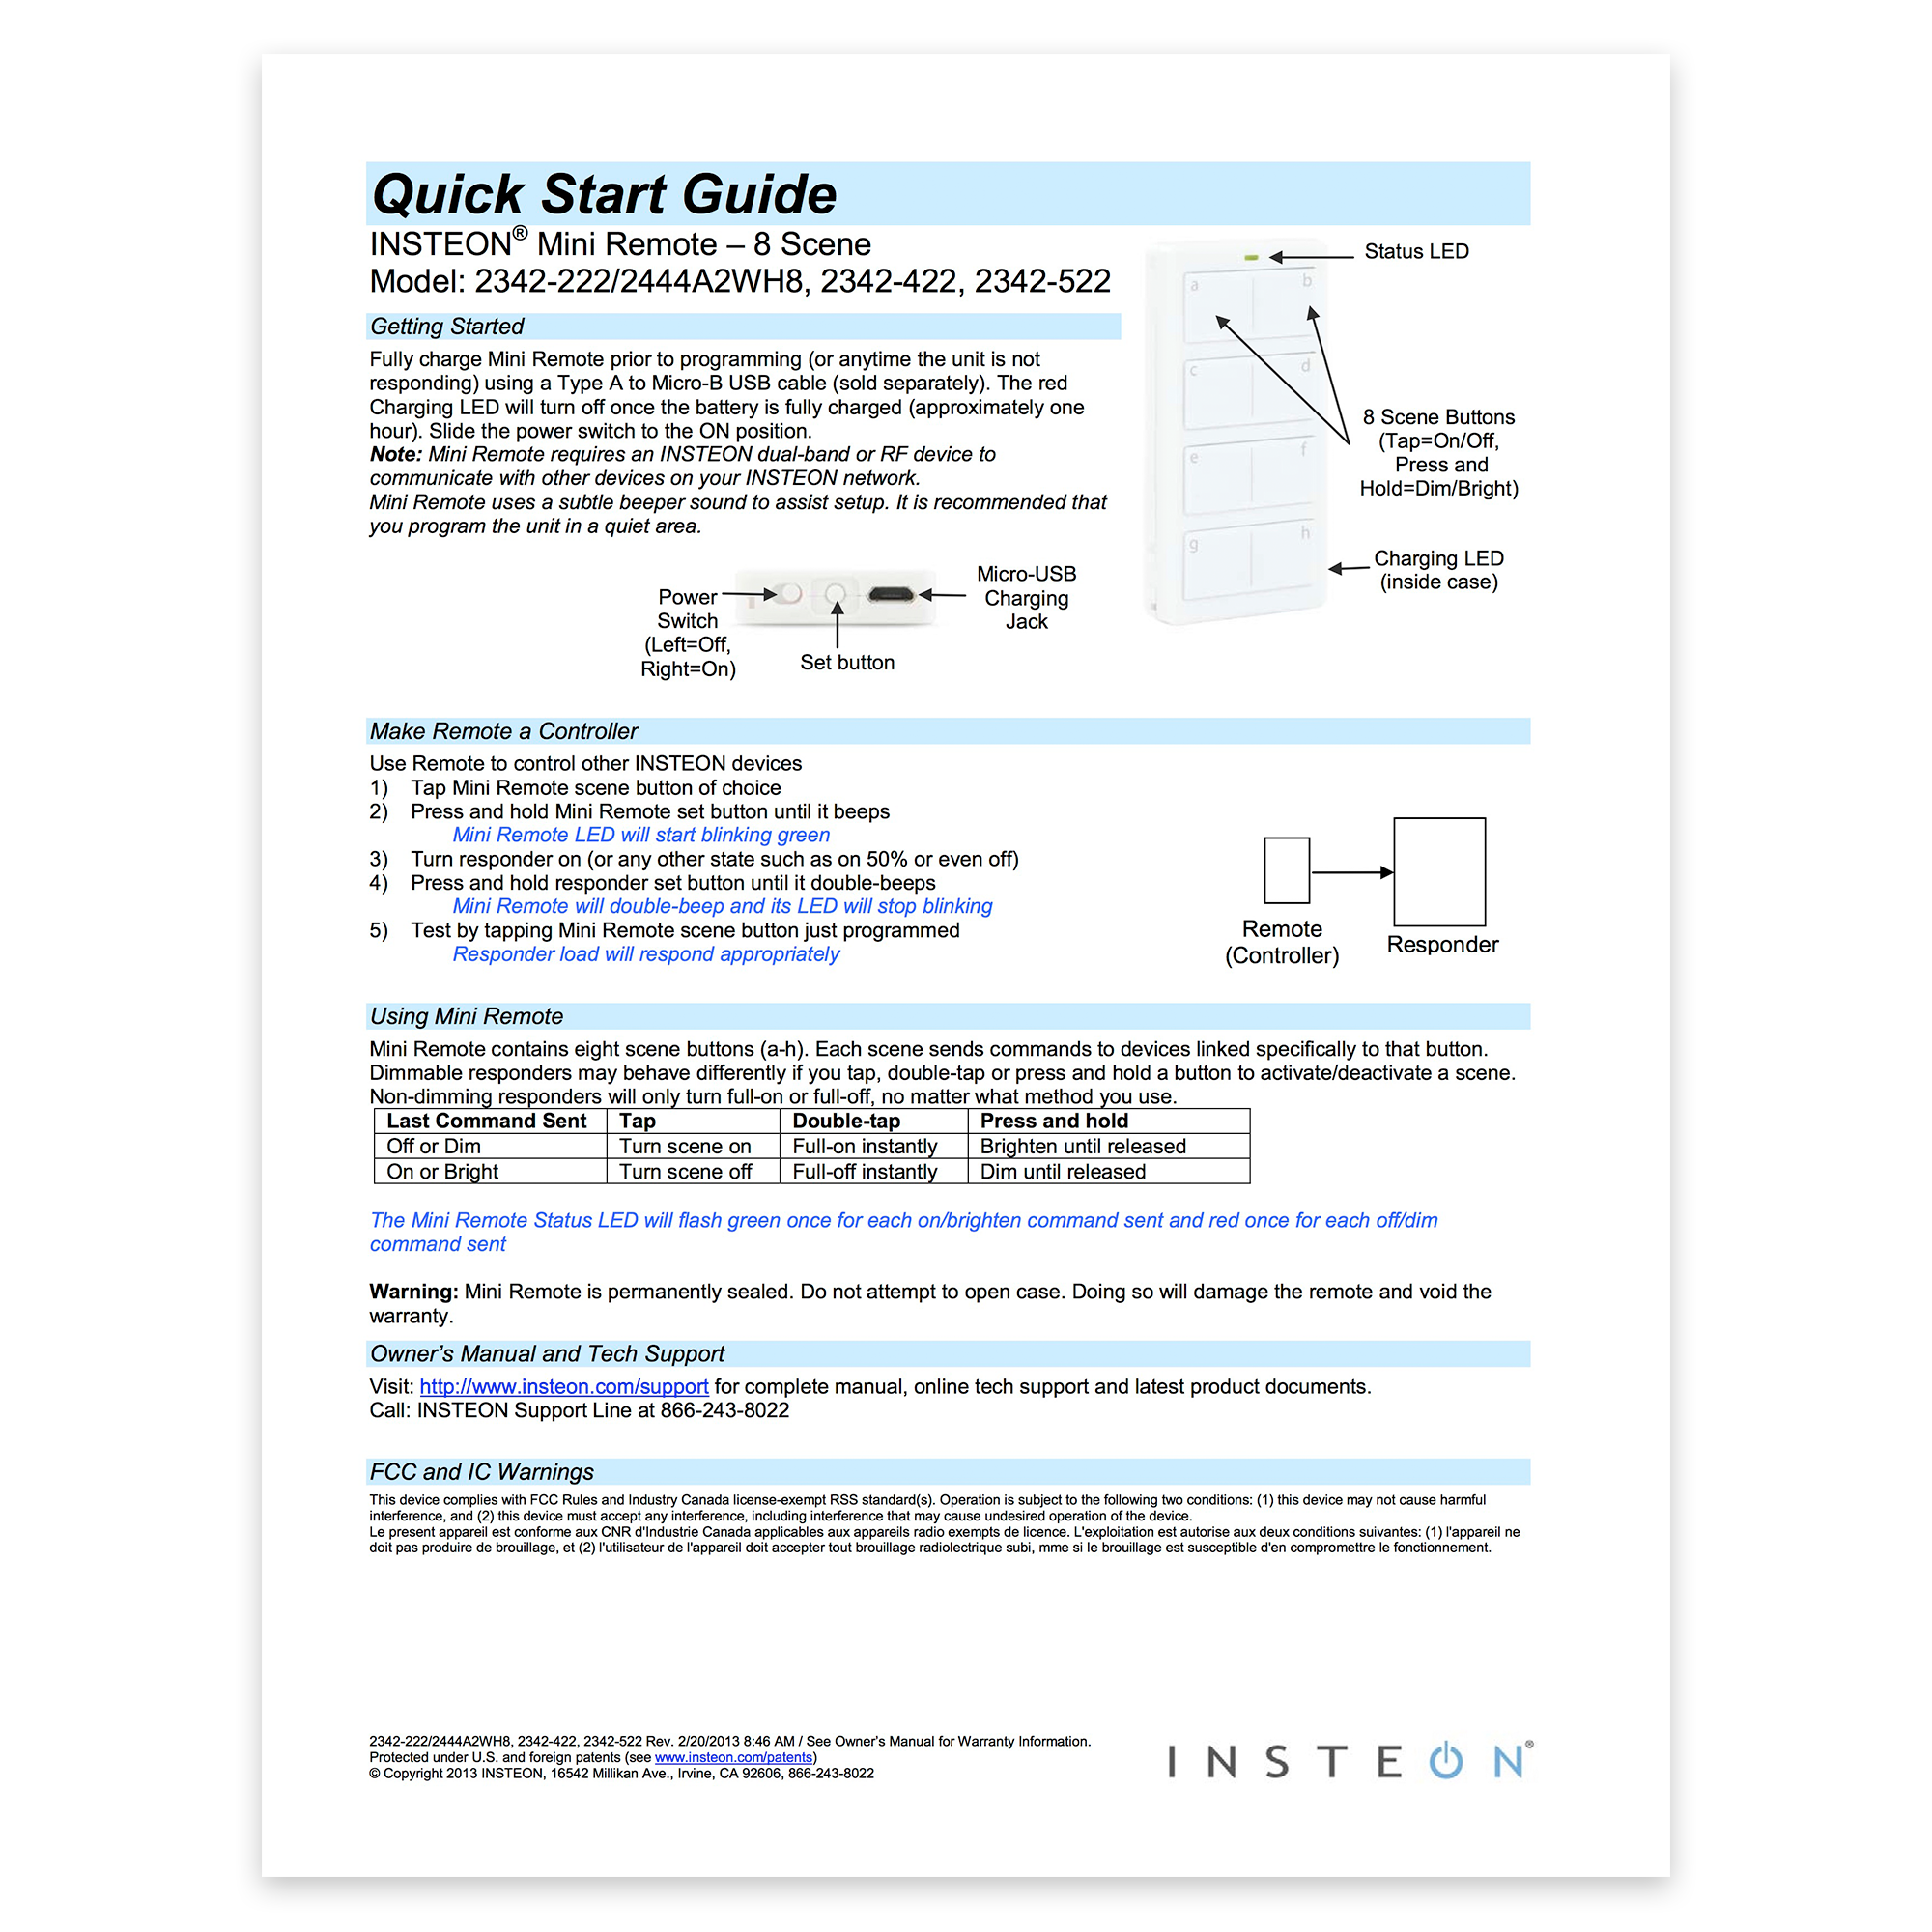
Mini Remote (8-Scene) Setup
Guides and Manuals
Quick Start Guides
Featured

Owner's Manual
Featured

Going Further
Featured


Canadien Français