Deleting your Insteon Account
Communication Types for Insteon Devices
Use this article to determine if your Insteon device can communicate with other Insteon devices via powerline-only, RF-only or powerline and RF (dual-band).
| Powerline | RF | |||
| Dimmer Module | 2456D3 | - | ||
| 2457D2X | - | |||
| 2457D2 | ||||
| On/Off Module | 2456S3 | - | ||
| 2635-222 | ||||
| Outdoor On/Off Module | 2456S3E | - | ||
| 2634-222 | ||||
| LED Bulb | 2672-222 | |||
| LED Bulb for Recessed Lights | 2674-222 | |||
| i3 Paddle | PS01 | |||
| i3 Dial | DS01 | |||
| Dimmer Switch | 2476D | - | ||
| 2477D | ||||
| Dimmer Switch (1000W) | 2476DH | - | ||
| 2477DH | ||||
| Dimmer Switch (2-Wire) | 2474DWH | - | ||
| On/Off Switch | 2476S | - | ||
| 2477S | ||||
| i3 Keypad | KP014 | |||
| Dimmer Keypad (6-Button or 8-Button) |
2486D | - | ||
| 2334-222 | ||||
| On/Off Keypad (6-Button or 8-Button) |
2486S | |||
| 2334-232 | ||||
| Dimmer Outlet | 2474DWH | |||
| i3 Outlet | WR01 | - | ||
| On/Off Outlet (2014) | 2663-222 | |||
| On/Off Outlet (2007) | 2473SWH | - | ||
| Wired Thermostat | 2441TH | - | ||
| Wireless Thermostat | 2441ZTH | - | ||
| Thermostat Adapter | 2441V | - | ||
| Mini Remote (Wireless Switch) |
2444A3 | - | ||
| 2342-242 | - | |||
| Mini Remote (4-Scene) |
2444A2WH4 | - | ||
| 2342-232 | - | |||
| Mini Remote (8-Scene) |
2444A2WH8 | - | ||
| 2342-222 | - | |||
| Wi-Fi Camera | 75790 | - | - | |
| 75790WH | - | - | ||
| HD Wi-Fi Camera | 2864-222 | - | - | |
| 2864-226 | - | - | ||
| Outdoor Wi-Fi Camera | 75791 | - | - | |
| HD Outdoor Wi-Fi Camera | 2864-232 | - | - | |
| Open/Close Sensor | 2421 | - | ||
| 2843-222 | - | |||
| Hidden Door Sensor | 2845-222 | - | ||
| Motion Sensor | 2420M | - | ||
| 2842-222 | - | |||
| Leak Sensor | 2852-222 | - | ||
| Smoke Bridge | 2982-222 | - | ||
| IO Module | 2450 | - | ||
| Ceiling Fan Controller | 2475F | |||
| Dimmer Micro Module | 2442-222 | |||
| On/Off Micro Module | 2443-222 | |||
| Open/Close Micro Module | 2444-222 | |||
| Ballast Dimmer | 2475DA2 | |||
| Dimmer In-Line Module | 2475D | - | ||
| 2475DA1 | ||||
| On/Off In-Line Module | 2475S2 | - | ||
| 2475SDB | ||||
| 220V Load Controller | 2477SA1 | |||
| 2477SA2 | ||||
| Dimmer DIN Rail Module | 2452-222 | |||
| On/Off DIN Rail Module | 2453-222 | |||
| MorningLinc | 2458A1 | - | ||
| Lock Controller | 2862-222 | - | ||
| IRLinc Transmitter | 2411T | - | ||
| IRLinc Receiver | 2411R | - | ||
| SeriaLinc | 2410S | - | ||
| Access Point | 2443 | |||
| Range Extender | 2992-222 | |||
| Energy Display | 2448A2 | - | ||
| iMeter Solo | 2423A1 | - | ||
| SynchroLinc | 2423A5 | - |
Wired Thermostat - Quick Start Guide

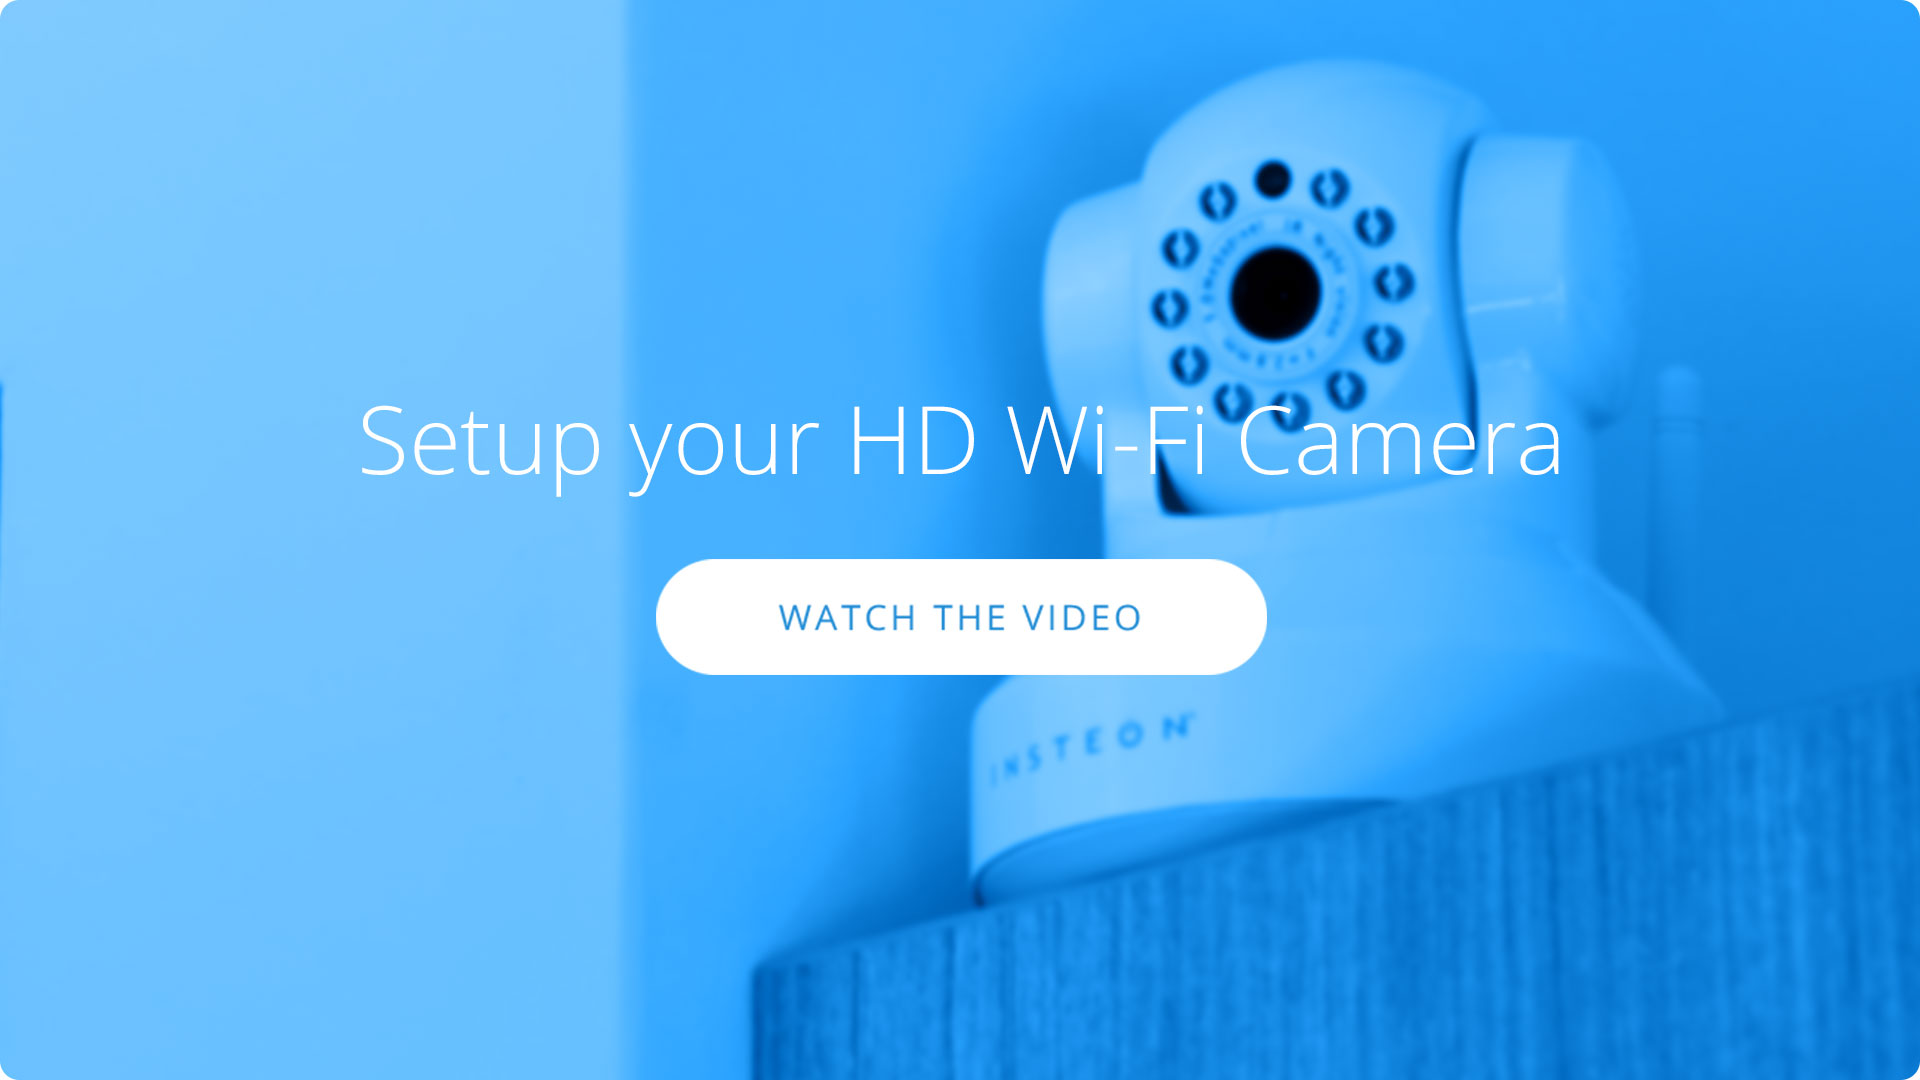
Wi-Fi Camera Setup
Getting Started

Connect the ethernet cable to your router and plugin the power adapter. You can disconnect the ethernet cable after setup is complete.

Connect the cables to your camera.

Guides, Manuals and Downloads
Quick Start Guide
Featured


Owner's Manual
Featured

Downloads
Featured

Optional Wall Mount
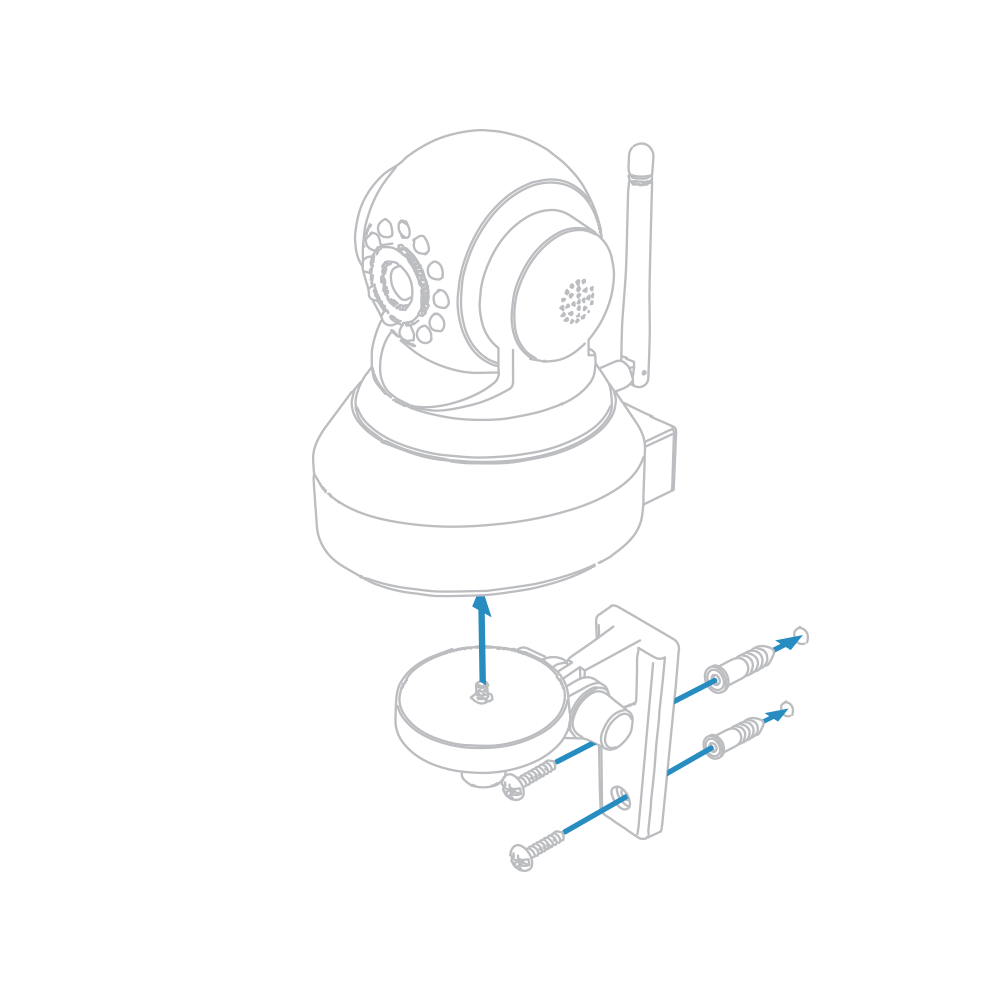
Mount the optional bracket using screws and wall anchors.
Camera Firmware

Current Wi-Fi Camera Firmware
Device 11.37.2.59Web UI 2.001.10.9
Outdoor Wi-Fi Camera Setup
As of December 31 2016 Insteon will no longer provide technical support for standard definition cameras (75791)
Getting Started

Connect the ethernet cable to your router and plugin the power adapter. You can disconnect the ethernet cable after setup is complete.

Connect the cables to your camera.
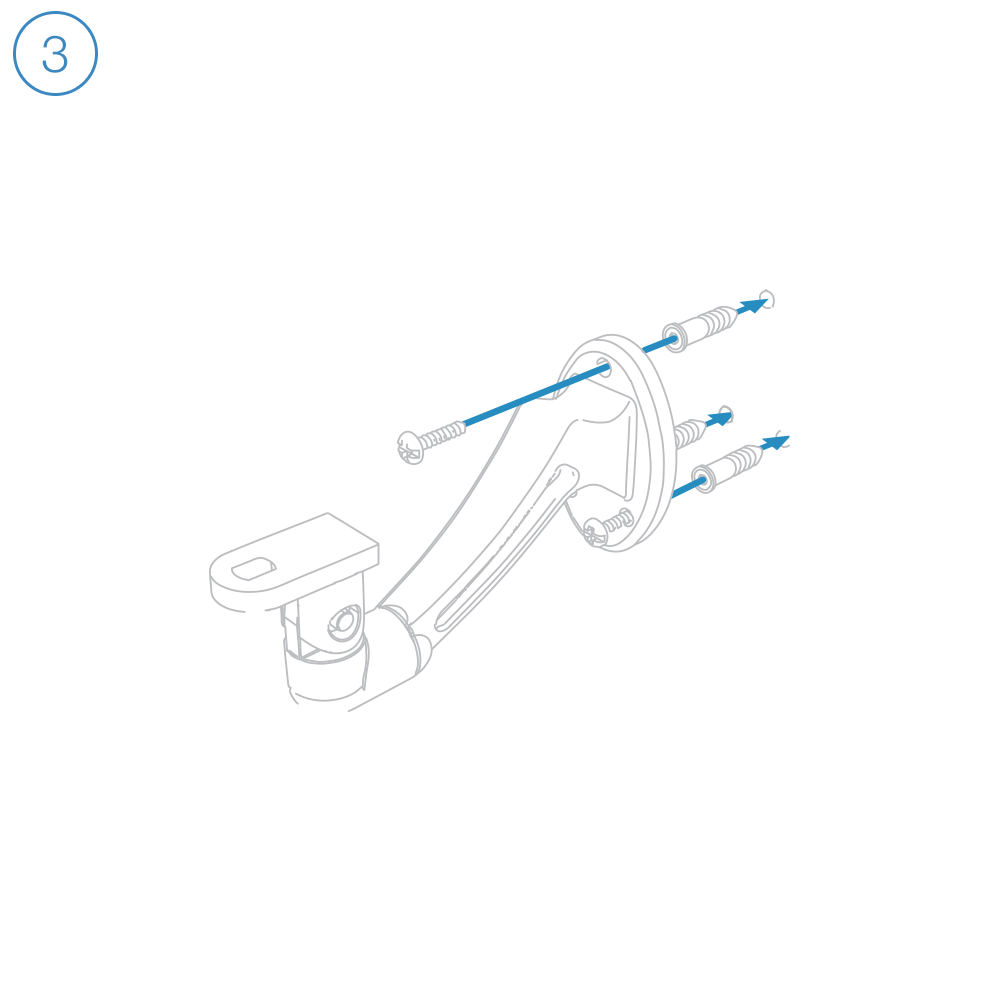
Mount the bracket using screws and wall anchors.

Position your camera and affix it with the set screw. Secure camera connections in a weather-resistant enclosure.

Guides, Manuals and Downloads
Quick Start Guide
Featured
Owner's Manual
Featured

Downloads
Featured
Camera Firmware
Keep your Outdoor Wi-Fi Camera up-to-date; updates add features, fix bugs and close potential security vulnerabilities.

Current Outdoor Wi-Fi Camera Firmware
Device 11.35.2.59Web UI 2.001.20.6
Outdoor HD Wi-Fi Camera Setup
Getting Started

Connect the ethernet cable to your router and plugin the power adapter. You can disconnect the ethernet cable after setup is complete.

Connect the cables to your camera.

Mount the bracket using screws and wall anchors.

Position your camera and affix it with the set screw. Secure camera connections in a weather-resistant enclosure.

Guides, Manuals and Downloads
Quick Start Guide
Featured

Owner's Manual
Featured

Downloads
Featured
Camera Firmware
Keep your HD Outdoor Wi-Fi Camera up-to-date; updates add features, fix bugs and close potential security vulnerabilities.

Current HD Outdoor Wi-Fi Camera Firmware
Camera Revision 5.0 or Later
System 1.9.3.16Application 2.51.2.33
HD Wi-Fi Camera Setup
Getting Started

Connect the ethernet cable to your router and plugin the power adapter. You can disconnect the ethernet cable after setup is complete.

Connect the cables to your camera.

Open the Insteon for Hub app and select Add a Camera. Insteon cameras require Insteon Hub.
Guides, Manuals and Downloads
Quick Start Guide
Featured

Owner's Manual
Featured
Downloads
Featured
Optional Wall Mount

Mount the optional bracket using screws and wall anchors.
Basic Troubleshooting
Camera Firmware
Keep your HD Wi-Fi Camera up-to-date; updates add features, fix bugs and close potential security vulnerabilities.

Current HD Wi-Fi Camera Firmware
Camera Revision 1.0 - 3.9
System 1.4.1.9Application 2.11.1.12
Current HD Wi-Fi Camera Firmware
Camera Revision 4.0 or Later
System 1.9.3.16Application 2.51.2.33
Sonos Player Features and Limitations
Use this article to understand the currently supported features and current limitations of Sonos Player integration.
Supported Features
Control play, pause, volume, and tracks for a Sonos Player from an Insteon Keypad, Mini Remote or Wall Switch
Trigger a Sonos preset from an Insteon Keypad, Mini Remote or Wall Switch
Controlling a Sonos Player from an Insteon device requires creating a scene. Learn more about creating a scene by viewing this article.
Current Limitations
App support is only available on iOS using the Insteon for Hub mobile app
Adding playlists is not currently supported on iOS 14+
A maximum of four Sonos Players can be added to the Insteon app.
Only one Sonos Player can be a member of a scene.
At this time, you are unable to edit Sonos Player functions from within a scene. If you wish to change a Sonos function after a scene has been created, delete the scene and re-create the scene with your desired changes.
At this time, Insteon app-learned presets do not work with all possible Sonos sources. The following sources have been tested and are known to function:
Amazon Music Stations
Apple Music Radio
Pandora Stations
tunein
To facilitate preset playback from an Insteon device, the Insteon app lets you learn source presets. Configuring these playlists is done from within the Insteon app when editing a Sonos Player settings.
You can learn up to ten Insteon app Sonos presets
These presets are shared among all configured Sonos Players
Insteon has tested Sonos support with the following Sonos Players:
Sonos Play:1
Sonos Play:3
Sonos Play:5
Sonos:Connect
Sonos Connect:Amp (ZP series)
Other Sonos Players may work but have not been tested by Insteon
If your Sonos Players or your router are disconnected from power, it may take up to two minutes before your Sonos Players are rediscovered by the Insteon Hub.
Additional Sonos Support
Sonos Player Not Found During Initial Setup
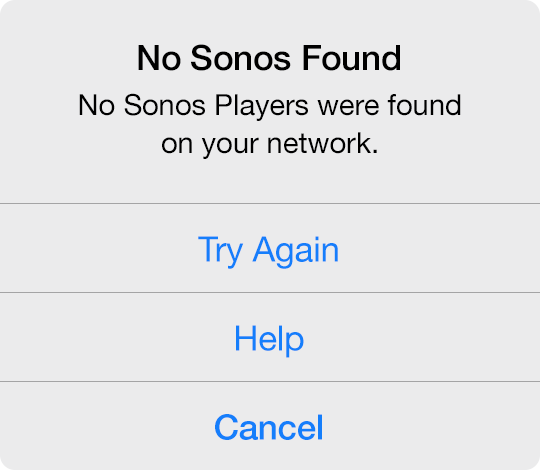
When adding a Sonos Player, you may encounter an alert informing you that the app was unable to find any Sonos Players on your network. There are several reasons why this may occur.
Your Sonos Player is unplugged from power
Your mobile device may be connected to a different Wi-Fi network than your Sonos Player or your mobile device may be connected to cellular only.
Your home's internet router or modem is not functioning properly
Basic Troubleshooting
Ensure that your Sonos Player is connected to a working power outlet. If your Sonos Player is connected via ethernet, check that the ethernet cable is firmly seated. It may be helpful to unplug and reinsert the ethernet cable.
Check to see if you can control your Sonos Player from the Sonos App on your mobile device.
Confirm that your internet router and cable or DSL modem are connected to power and turned on. Learn how to Identify your router and cable or DSL modem.
Try restarting your router and cable or DSL modem.
Additional Sonos Support
Connect to Wi-Fi When Adding a Sonos Player
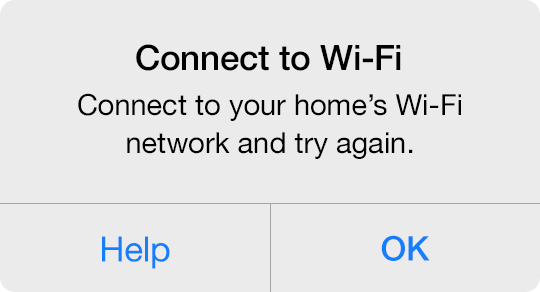
When adding a Sonos Player, you may encounter an alert informing you to connect to your home's Wi-Fi network.
Basic Troubleshooting
Connect your mobile device to your home's Wi-Fi network. You are unable to add a Sonos Player to the Insteon app when on a cellular 3G, 4G or LTE connection.
Connecting to Wi-FI on iPhone, iPad or iPod touch
- Tap the Home button on your iPhone, iPad or iPod touch and navigate to Settings.
- Tap Wi-Fi
- Ensure Wi-Fi is on and tap your home's Wi-Fi network. If you have more than one Wi-Fi router, it is important to join the same Wi-Fi network as that used by your Sonos Player.
- Tap the Home button on your iPhone, iPad or iPod touch and return to the Insteon app to complete your Sonos setup.
Connecting to Wi-Fi on an Android device
- Tap the home button on your Android device and navigate to Settings.
- Tap Wi-Fi
- Ensure that Wi-Fi is on and tap your home's Wi-Fi network. If you have more than one Wi-Fi router, it is important to join the same Wi-Fi network as that used by your Sonos Player.
- Tap the Home button on your Android device and return to the Insteon app to complete your Sonos setup.
Additional Sonos Support
You Already Have the Maximum Number of Sonos Players Configured
When adding a Sonos Player, you may encounter a message informing you that you have already configured the maximum number of Sonos Players. Insteon Hub supports a maximum of four Sonos speakers.
Additional Sonos Support
No Music Playing when Learning a Sonos Preset

When learning a preset with your Sonos Player, you may encounter an alert informing you that no music was heard while listening to your Sonos Player. For the Insteon app to remember your musical selection in a preset, music must be actively playing from your Sonos Player.
Basic Troubleshooting
- Tap the Home button on your mobile device
- Navigate to and open the Sonos app
- Select the desired music from any of the sources available.
- When music begins playing, tap the Home button and return to the Insteon app.
Additional Sonos Support
Controlling a Sonos Player from an Insteon Device
To control Sonos functions or trigger presets from an Insteon device, create a scene for each desired function.
Create a Scene
Step 1
Open the Drawer and tap Create a Scene

Step 2
Give your scene a name that matches its intended function and pick an icon
Step 3
From the Scene Members list of devices, tap the Insteon device or devices that you wish to use to control your Sonos Player.
With Keypads and Mini Remotes, select the corresponding button from the list of device buttons.

Step 4
Tap the Sonos Player that you want to control

Step 5
Tap the function you want to control and then tap Next
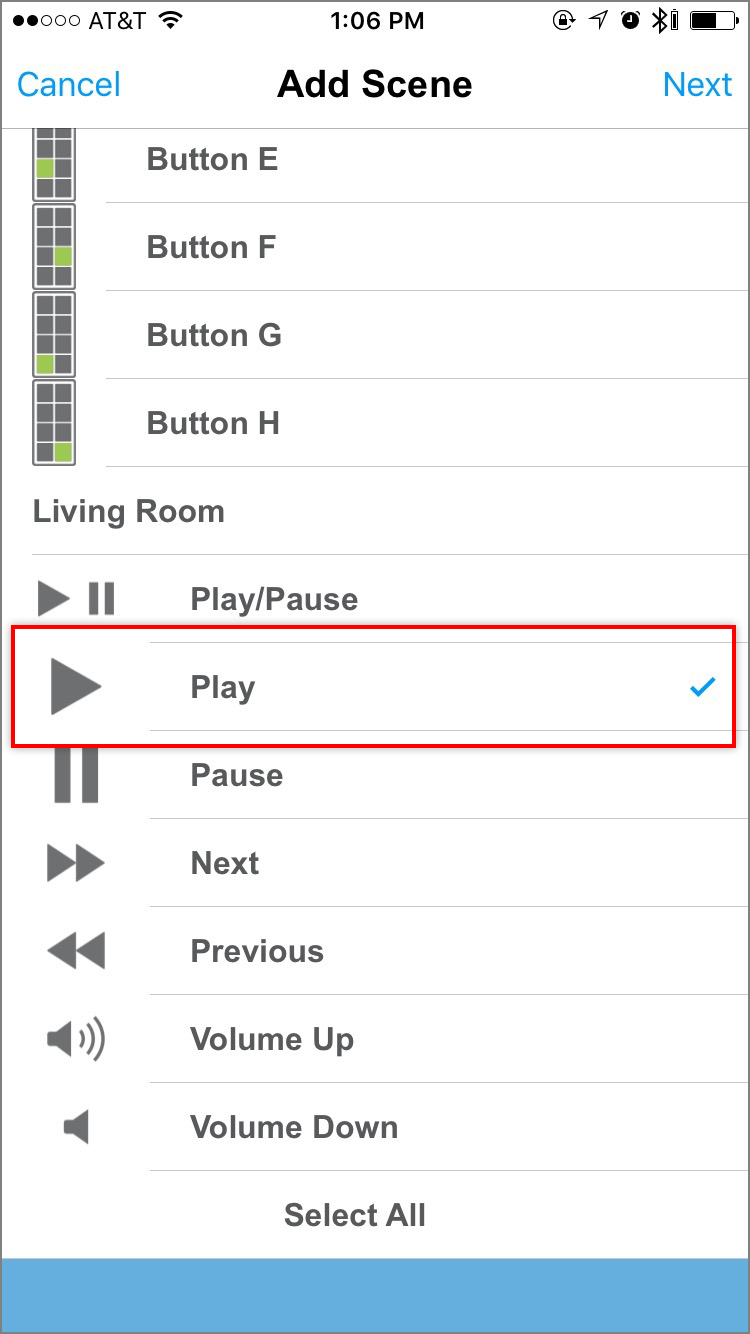
Step 6
For each Insteon device, tap the blue Responder button until it reads "Both" and then tap Done.
Repeat the above steps for each additional Sonos Player function you wish to control.

Additional Sonos Support
Restore Insteon Hub to the last Known-Good Firmware Version
Houselinc Device Definitions - 2.9.85
Alert Module - Owner's Manual

Something Went Wrong While Configuring Your Camera

When configuring an Insteon Wi-Fi Camera, you may occasionally encounter a message informing you that something went wrong while configuring your camera and to ensure that the ethernet cable is connected. There are several reasons why this may occur.
Your Wi-Fi connection is offline
Your Wi-Fi Camera was unplugged from ethernet or power
Basic Troubleshooting
Ensure that your Wi-Fi Camera is connected to a working power outlet and that the ethernet cable is firmly seated, even if you intend to use your camera with WI-Fi. It may be helpful to unplug and reinsert the ethernet cable.
Try restarting your Insteon Wi-Fi Camera by unplugging its power cord. Wait about 30 seconds and then reconnect your camera to power.
Ensure that your smartphone or tablet is connected to the same Wi-Fi Network as your Insteon Wi-Fi Camera.
Confirm that your internet router and cable or DSL modem are connected to power and turned on. Learn how to identify your router and cable or DSL modem.
Check that your Wi-Fi router is working by attempting to browse a website using another device or computer in your home.
Try restarting your router and cable or DSL modem.
Something Went Wrong While Configuring the Camera Password
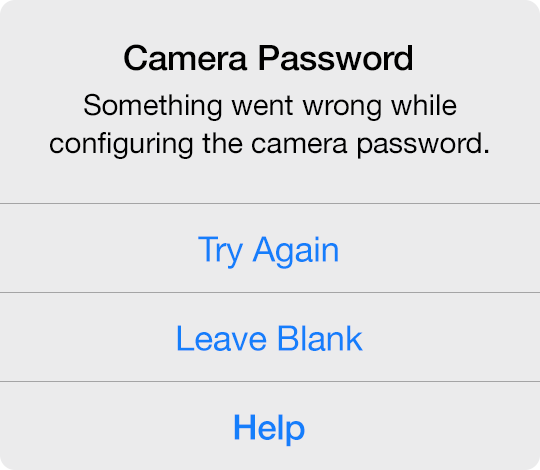
When configuring an Insteon Wi-Fi Camera, you may occasionally encounter a message informing you that something went wrong while configuring the camera password. There are several reasons why this may occur.
The password was shorter than 1 character or longer than 12 characters
The password included characters other than numbers and letters
The password included spaces
The Insteon app should properly restrict entry of passwords such that they do not contain any unsupported or invalid characters. If you are unable to resolve the password following the restrictions above, you can tap Leave Blank to proceed without a camera password. After setup is complete, you can change the password from Edit Camera.
Changing the Camera Password from Edit Camera
Step 1
From Edit Camera, scroll down to Network Settings and tap Password

Step 2
Replace the blank password with your desired camera password. Ensure your password meets the following criteria:
Between 1 and 12 characters long
Letters and numbers only
No spaces
Case sensitive

Step 3
Tap Done
The Insteon app will update your camera's password and attempt to reconnect.

Basic Troubleshooting
If, after changing your camera's password, the Insteon app is unable to connect to your camera, attempt setup of your camera again.
Navigate to Edit Camera, scroll to the bottom and tap Delete Camera
Add a Device and choose Camera
In the list of cameras, your camera should appear as already configured
Enter the user name and new password chosen in step 2 above. If you receive an error informing you that the user name or password is incorrect, try using a blank password as it's possible the camera password was not updated.
If you are still unable to connect to your camera, follow the steps in this article to factory reset your camera and start again.
Something Went Wrong While Configuring the Camera User Name
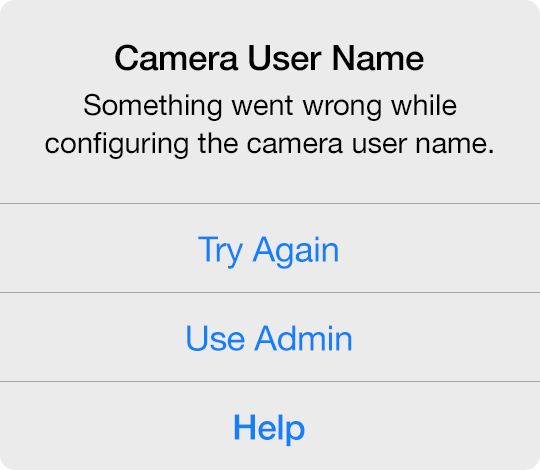
When configuring an Insteon Wi-Fi Camera, you may occasionally encounter a message informing you that something went wrong while configuring the camera user name. There are several reasons why this may occur.
- The user name was shorter than 1 character or longer than 12 characters
- The user name included characters other than numbers and letters
- The user name included spaces
The Insteon app should properly restrict entry of user names such that they do not contain any unsupported or invalid characters. If you are unable to resolve the user name adhering to the restrictions above, you can tap Use Admin to use the default camera user name "admin" and complete setup. After setup is complete, you can change the user name from Edit Camera.
Changing the Camera User Name from Edit Camera
Step 1
From Edit Camera, scroll down to Network Settings and tap Username.

Step 2
Replace admin with your desired camera user name. Ensure your user name meets the following criteria:
- Between 1 and 12 characters long
- Letters and numbers only
- No spaces
- Case sensitive

Step 3
Tap Done
The Insteon app will update your camera's user name and attempt to reconnect.

Basic Troubleshooting
If, after changing your camera's user name, the Insteon app is unable to connect to your camera, attempt setup of your camera again.
- Navigate to Edit Camera, scroll to the bottom and tap Delete Camera.
- Add a Device and choose Camera
- In the list of cameras, your camera should appear as already configured.
- Enter the new user name chosen in step 2 above. If you receive an error informing you that the user name or password is incorrect, try using the user name "admin" as it's possible the camera user name was not updated.
- If you are still unable to connect to your camera, follow the steps in this article to factory reset your camera and start again.