Factory Reset an Insteon Wi-Fi Camera


If you are unable to connect to your Insteon Wi-Fi Camera, have forgotten your camera's user name and or password or otherwise wish to reset your Wi-Fi Camera to factory settings with the default user name and password.


Factory reset your Insteon Wi-Fi Camera

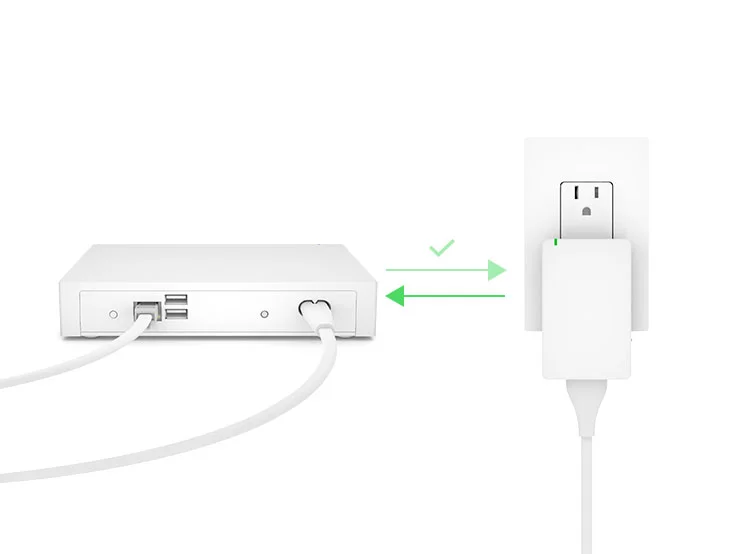
  1. Connect your camera to your router using an ethernet cable.
  2. Ensure your camera is connected to power.
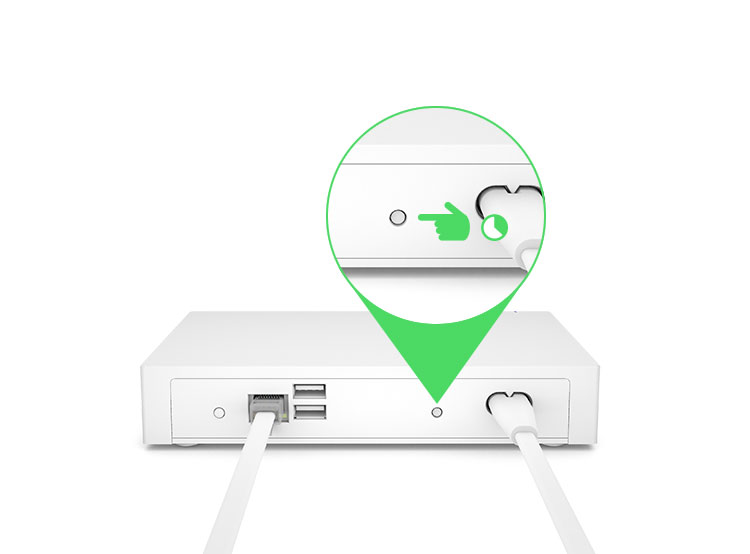
  3. Use a straightened paperclip to press and hold the recessed reset button for 10 seconds. If your camera was connected to power less than 60 seconds prior to attempting a factory reset, you may need to wait for the camera to completely start up before you can attempt the factory reset.
reset-indoor-camera.png

On Insteon Wi-Fi Cameras and Insteon HD Wi-Fi Cameras, the reset button is located on the bottom of the camera housing.

reset-outdoor-camera.png

On Insteon Outdoor Wi-Fi Cameras and Insteon HD Outdoor Wi-Fi Cameras, the reset button is located at the end of the combined power and data cable.


Additional Information

Factory resetting your camera will restore these settings to default:

  1. Basic Settings
    • Camera Name
    • Logs
    • Camera Time settings including time zone and NTP options
    • User Accounts and Passwords. After resetting your camera, your camera's user name will be "admin" and the password will be blank
    • Multi-camera configuration (HD Cameras only)
  2. Network Settings
    • IP Address settings
    • After resetting your camera, your camera will use DHCP to obtain an IP Address
    • Wi-Fi Settings
    • Configured PPPoE settings
    • DDNS settings
    • UPnP Settings
    • Custom port settings
    • Email alert settings
    • FTP upload settings
    • Automatic Remote Access settings. After resetting your camera, Automatic Remote Access will default to enabled.
    • Camera firewall settings
  3. Video Settings
    • Video timestamp and on-screen display
    • Configured privacy zones
    • Configured snapshot settings
    • Configured IR LED schedule
  4. Alarm Settings
    • Configured motion detection settings
  5. Recording Settings
    • FTP upload settings
    • Alarm recording settings
    • Local alarm settings
    • Scheduled recording settings
  6. Pan and Tilt Settings (Indoor Cameras only)
    • Pan and tilt speed
    • Cruise settings
    • Power-on position settings


Insteon Wi-Fi Camera Not Found During Initial Setup

 
no cameras found.png
 

When initially setting up your Insteon Wi-Fi Camera, you may encounter a message informing you that the app was unable to locate any cameras on your network. There are several reasons why this may occur.

  • Your Insteon Wi-Fi Camera is not connected to power

  • Your Insteon Wi-Fi Camera is not connected to your router with an ethernet cable

  • Your home's internet router or modem is not functioning properly

If you see a list already-configured cameras, ensure that you are connected to the correct Wi-Fi network. The Insteon app will display any Insteon cameras found on the connected Wi-Fi network, even if those cameras are already configured.


Basic Troubleshooting

  1. Ensure that your Insteon Wi-Fi Camera is connected to a working power outlet and that the ethernet cable is firmly seated. It may be helpful to unplug and reinsert the ethernet cable. If your the LEDs above the ethernet port on the rear of the camera are not illuminated, your Wi-Fi Camera is not connected to a functioning ethernet port on your router. Indoor Insteon Wi-Fi Cameras should initiate a motor test about 10 to 30 seconds after connecting to power.

  2. Try restarting your Insteon Wi-Fi Camera by unplugging its power cord. Wait about 30 seconds and then reconnect your camera to power.

  3. Ensure that your smartphone or tablet is connected to the same Wi-Fi network as your Insteon Wi-Fi Camera.

  4. Confirm that your internet router and cable or DSL modem are connected to power and turned on. Learn how to Identify your router and cable or DSL modem.

  5. Check that your Wi-Fi router is working by attempting to browse to a website using another device or computer in your home.

  6. Try restarting your router and cable or DSL modem.

If none of the above steps resolved your issue, follow the steps outlined in this article to perform a factory reset.

Identify your Air Conditioning System Type


There are many types of heating and cooling systems found in residential and commercial settings. Use the information in this article to help identify your system type and what Insteon devices can be used for control.

 
window-ac.png

Window Units

Window Air Conditioning Systems are typically installed in an open window and usually connect to power with a 110V or possibly 220V power cord. As these systems usually have an integrated thermostat, they are incompatible with Insteon Thermostat.

If your system resumes cooling or heating after being disconnected from power, you may be able to control it with an Insteon On/Off Module and Wireless Thermostat.


Mini-Split (Ductless) Systems

Mini-Split or ductless systems place one or several indoor units in your home that connect to an outdoor compressor. These systems usually operate as a heat pump.

Most mini-split systems are usually supplied with a proprietary, integrated thermostat and as such, are incompatible with Insteon Thermostat. If your system offers an adapter to connect 3rd-party 24V thermostats, it may be compatible with Insteon Thermostat for Heat Pumps.


Central Air Conditioning

Most standard central air conditioning systems consist of an indoor air handler and furnace as well as an outdoor compressor. Small vent registers are located throughout the home with ducting returning to the central air handler.

  • Insteon Thermostat is compatible with the majority of central air conditioning systems that have one or two cooling stages and one or two heating stages.
  • Insteon Thermostat for Heat Pumps is compatible with the majority of heat pump systems including those with auxiliary or emergency heat.

As these systems can vary greatly, it is best to inspect the wires connected to your existing thermostat.

Conventional Central System

  • Look for a white wire connected to W or W1 on your existing thermostat
  • Look for a yellow wire connected to Y or Y1 on your existing thermostat

Heat Pump System

  • Look for a brown or orange wire connected to O/B, W or W1
  • If you have wires connected to terminals labeled E or AUX and those terminals do not have any additional labels, you likely have a heat pump
  • If your home is "all electric" and lacks utilities for gas or propane and you have a central heating and cooling system, you likely have a heat pump
  • If your home uses a geothermal system, you likely have a heat pump

The colors of wires in your home may vary. If you are still uncertain, search for the brand and model number of the large condenser unit outside on the internet. 

 
portable-unit.png

Portable Units

Portable units can be moved from room to room and usually connect to power with a 110V or possibly 220V power cord. As these systems usually have an integrated thermostat, they are incompatible with Insteon Thermostat.

If your system resumes cooling or heating after being disconnected from power, you may be able to control it with an Insteon On/Off Module and Wireless Thermostat.


Millivolt Heaters

Direct-vent millivolt heaters are usually older single-room systems that are controlled by a 2-wire or battery-powered thermostat. Some are large and mounted on a wall, others may be integrated into a floor register. Examining the thermostat, you should find only a red and white wire.

As these systems do not supply power, they are incompatible with Insteon Thermostat without additional products.

You may be able to control this type of heating system with Insteon:


Electric Baseboard Heaters and Line Voltage Systems

Electric baseboard heaters are usually long and shallow metal enclosures located along the baseboard throughout rooms in your home, controlled by a thermostat or wall switch located in the same room. Some line voltage systems may also be enclosed in a wall vent with a blower fan.

Examining the thermostat, you should find thick wires connected with wire nuts. You may also see labels warning 110V, 220V, or high voltage.

These systems are not compatible with Insteon Thermostat but may be controllable using other Insteon devices.

If the heater load is less than 17A, you may be able to control this heater with an Insteon On/Off Switch and Wireless Thermostat.


Control Insteon Devices from your Logitech Harmony Hub


With Insteon Hub (2245-222) and Harmony Ultimate Home, Harmony Home Control or Harmony Home Hub, you can integrate your Insteon-controlled lights and appliances with your home entertainment system.


Add Insteon Hub to the Harmony App

Step 1

Launch the Harmony app on your smartphone and navigate to Devices. Tap the Edit Devices button.

01-tap-edit-devices.png

Step 2

Tap the + Device button.

02-tap-add-device.png

Step 3

Tap Home Control

03-tap-home-control.png

Step 4

Tap Insteon Hub

04-tap-insteon-hub.png

Step 5

To connect your Insteon Hub to your Harmony Hub, you will need to enter your Insteon account information. Tap Sign In.


05-tap-sign-in.png

Step 6

Enter your Insteon account user name and password.


06-enter-username-and-password.png

Step 7

After a few moments, you will see a list of supported Insteon devices that can be used in Harmony activities.

07-discoverd-devices.png
 

Configuring On/Off Devices

If your home includes On/Off devices like On/Off Outlet or On/Off Module, Harmony requires that you categorize the controlled device as either a Light or a Plug.

Step 1

To specify the type of controlled device, tap the device name.

on-off-01.png

Step 2

Tap Lights or Plugs to change the Harmony's categorization for that device.

on-off-2.png


Control Insteon Devices from Logitech Harmony Home Control Buttons


With Insteon Hub (2245-222) and Harmony Ultimate Home Control or Harmony Home Hub, you can control Insteon lights and appliances directly from your remote control using the Home Control buttons.


Assign Insteon Devices to your Remote's Home Control Buttons

Step 1

From the Harmony app, open the settings drawer

Step 2

Tap Harmony Setup

Step 3

Tap Add/Edit Devices & Activities

Step 4

From the Settings screen, scroll down and select Remote & Hub

Step 5

Tap Harmony Home Control Button Customization

Step 6

Tap Home Control Buttons

Step 7

Tap the button for which you would like to assign an Insteon device and then tap the Assign button to chose an Insteon light or appliance.

Repeat these steps for the four Home Control buttons and, when finished, tap the next arrow.


Include Insteon Devices in Logitech Harmony Activities


After you have added Insteon Hub to your Harmony Home Ultimate, Harmony Home Control or Harmony Home Hub, you can add Insteon devices to your Harmony Activities.


Add Insteon Devices to a Harmony Activity

Insteon devices can be added when you create a new Harmony activity or added to an existing activity. These instructions show you how to add Insteon devices to an existing Harmony activity.

Step 1

From the Activities tab in the Harmony app, tap Edit Activities.

Step 2

Tap the activity for which you would like to add Insteon devices.

Step 3

On the Activity Summary screen, scroll down and tap Re-Run Activity.

Step 4

Tap the checkbox for each Insteon device that you would like to include.

Step 5

Follow the on-screen instructions to move through the setup wizard until you reach Adjusting Devices.


Tap the checkbox for each device that you would like to include when your activity starts.

Step 6

Adjust the devices to their desired states, making sure to tap the power symbol if you want the light or appliance on. To brighten or dim a light, drag the vertical black line between low and high.

Step 7

You can chose when Harmony will control these devices by tapping the When to Adjust button. 

Step 8

Tap the next arrow and repeat the adjustment steps for when your activity ends. When finished, tap the next arrow to save your changes and complete setup.


No Insteon Devices found when Adding Insteon Hub to Logitech Harmony Home


You may occasionally encounter a message informing you that Harmony Hub couldn't find any supported devices in your Insteon Hub account. There are several reasons why this might occur.

  • You don't have any devices setup with your Insteon Hub
  • You don't have any controllable devices setup with your Insteon Hub
  • An error may have occurred while downloading your Insteon Hub configuration
 

Refresh your Insteon Hub Devices

Step 1

Tap Refresh / Re-Login

no-devices-01.png

Step 2

Wait while Harmony Hub discovers your Insteon devices. If Harmony still doesn't discover any devices, try removing and re-adding Insteon Hub from the Harmony app.

no-devices-02.png


Supported Insteon Devices with Logitech Harmony

While Logitech Harmony Home supports control and monitoring of many Insteon devices, not all devices are supported and some devices may not support all features. Use the table below to identify if your device is supported.

Logitech Harmony Home requires Insteon Hub (2245-222).

Identify your model of Insteon Hub

 
Device Supported in Harmony
Dimmer Module Supported
On/Off Module Supported
Outdoor On/Off Module Supported
LED Bulb (A19)

Supported

LED Bulb for Recessed Lights (PAR38)

Supported

Dimmer Switch Supported
Dimmer Switch (1000W) Supported
Dimmer Switch (2-Wire) Supported
On/Off Switch Supported
Dimmer Toggle Switch Supported
On/Off Toggle Switch Supported
Dimmer Keypad (6-Button) Controls connected light only
Dimmer Keypad (8-Button) Controls connected light only
On/Off Keypad (6-Button) Controls connected light only
On/Off Keypad (8-Button) Controls connected light only
Dimmer Outlet Supported
On/Off Outlet (2011) Supported
On/Off Outlet (2014) Controls top outlet only
Wired Thermostat -
Wireless Thermostat -
Venstar Thermostat Adapter -
Ceiling Fan Controller Controls connected light only
Dimmer DIN Rail Module Supported
On/Off DIN Rail Module Supported
Dimmer Micro Module Supported
On/Off Micro Module Supported
Open/Close Micro Module -
0-10V Ballast Dimmer Supported
Dimmer In-Line Module Supported
On/Off In-Line Module Supported
220V Load Controller (Normally Open) -
220V Load Controller (Normally Closed) -
WiFi Cameras -
Open/Close Sensor Monitoring only. Not currently supported as an activity trigger.
Hidden Door Sensor Monitoring only. Not currently supported as an activity trigger.
Motion Sensor Monitoring only. Not currently supported as an activity trigger.
Leak Sensor Monitoring only. Not currently supported as an activity trigger.
Smoke Bridge -
IO Module -
Mini Remotes -
Door Lock and Deadbolt Controller -
IR Transmitter -
IR Receiever -
Serial Bridge -
iMeter Solo -
SynchroLinc -
 

Incorrect Account User Name or Password during Hub Setup


alert-ui.png
 

You may occasionally encounter an alert informing you that your account user name or password is incorrect during initial Insteon Hub setup. There are several reasons why this might occur.

  • The user name or password was mistyped.
  • The user name or password has been changed since the last login with the Insteon app.
  • Your account entry in Insteon's database may be damaged and need to be recreated.
 

Resolution

If you encounter this message while attempting to add an Insteon Hub for the first time, please contact Insteon support and reference this article.

If you encounter this message while attempting to add a second Insteon Hub, try signing out of the Insteon app and then begin the add process again. If you still encounter this message, please contact Insteon support and reference this article.


Connect to Wi-Fi and Scan the QR Code Again


alertui.png
 

When setting up an Insteon Hub (2014) for the first time, you may encounter an alert informing you to connect to your home's WiFi network and scan the QR code again. This alert will appear for Insteon Hubs with firmware versions 1005 and prior.


Step 1

Tap the Home button on your iPhone, iPad or iPod touch and navigate to settings.

Step 2

Tap WiFI

Step 3

Ensure WiFi is on and tap your home's WiFi network.

If you have more than one WiFi router, it is important to join the WiFi network created by the router into which your Insteon Hub is connected. Learn more about identifying your home's WiFi router.

Step 4

Tap the Home button on your iPhone, iPad or iPod touch and return to the Insteon app.


Adding an Insteon Device with the Set Button

With Insteon+ and Hub Pro, you can control both Insteon-native devices as well as HomeKit-compatible devices. Follow these steps to add an Insteon device to Insteon+ using the set button.


1. Press and hold the set button on the back of Hub Pro until Hub Pro beeps.


2. Press and hold the set button on your Insteon device until it double beeps or its LED begins blinking. If adding Insteon bulbs, remove power and re-apply power. Bulbs will enter linking mode on power up. 

 
device-set-button.jpg


3. Repeat the process in reverse, starting with the new Insteon device.

 
device-set-button.jpg


4. Navigate to All Devices. Your new Insteon device should appear with a generic icon and name. If your device does not appear, force-close the Insteon+ app and restart. 


5. Tap the Configure button in the upper right corner to open the Configure your Home sheet.


6. Tap Edit Devices.

iOS Simulator Screen Shot May 4, 2015, 10.04.25 AM.png


7. Select your new Insteon device from the list of devices.


8. Finish up by giving your device a name and selecting an icon.


Deleting an Insteon Device with the Set Button

If a device has stopped functioning or if you are replacing an older device with a newer device, you can remove it from Insteon+. Follow the steps in this article to remove an Insteon device from Insteon+. Removing a device will also remove it from any room, schedules and scenes and cannot be undone.


Delete an Insteon Device from Insteon+

1. Press and hold the set button on the back of Hub Pro until Hub Pro beeps. Press and hold the set button on the back of Hub Pro until Hub Pro beeps again.


2. Press and hold the set button on your old Insteon device until it double beeps.


3. Repeat the process in reverse, starting with your old Insteon device. After several moments, the Insteon device will disappear from Insteon+.


If An Insteon Device Has Not Disappeared from Insteon+

If you have followed the steps to remove an Insteon device from Insteon+ but the removed device continues to show and no longer responds, try the troubleshooting steps below.

Sign out of Insteon+


1. Navigate to Homes and tap Settings


2. Tap Sign Out


Force Quit Insteon+


1. With Insteon+ open on your iPhone, iPad or iPod touch, press and hold the power button until Slide to Power Off appears.


2. Release the power button and press and hold the Home button until Insteon+ disappears.


Update your HD Wi-Fi Camera Firmware


Follow the instructions in this article to update the System Firmware and Application Firmware on your Insteon HD WiFi Camera. The steps in this article apply to Insteon HD WiFi Camera and Insteon Outdoor HD WiFi Camera. For instructions on how to update your SD WiFi Camera firmware, see Update your SD WiFi Camera System Firmware.


Identify your WiFi Camera Firmware Version

Follow the instructions in Identify your WiFi Camera Firmware Version to determine if your WiFi Camera requires updating.


Update your HD WiFi Camera System Firmware

1. Download the most current firmware for your Insteon HD WiFi Camera or Insteon HD Outdoor WiFi Camera


2. Open the IP Camera tool and wait for it to identify the Insteon WiFi Camera that you wish to update.


3. When the desired Camera appears, double-click to select it in the list. This should launch your computer’s default web browser and take you to a login page for the camera.

4. Enter your Camera’s user name and password. If you never changed the user name or password, the default user name is “admin” and the default password is blank.

5. Click Login

6. Click the Settings tab at the top of the window

7. In the left sidebar, click System

8. Click Back-up & Restore

9. Click the Backup button. A file will download to your computer named configs.bin. This file contains all of the settings and configuration for your camera and will be used to restore your preferences after the firmware update.

10. Click System Upgrade

11. Click the Choose File button and select the firmware file downloaded from insteon.com at the beginning of these instructions.

12. Click the System Upgrade button. The upgrade process will take about 3 minutes during which time your camera will restart. Do not unplug your camera or refresh your browser during this time. When the upgrade is complete, your browser will refresh automatically.

13. If presented with a Login window, enter your camera’s user name and password and click Login

14. Click the Settings tab

15. In the left sidebar, click Status

16. Click Device Information

17. Confirm that the version displayed in the System Firmware Version matches the updated system firmware


Update your HD WiFi Camera Application Firmware

The web user interface is updated separately from the camera system firmware but the steps are identical.

1. In the left sidebar, click System

2. Click System Upgrade

3. Click the Choose File button and select the user interface file downloaded from insteon.com at the beginning of these instructions.

4. Click the System Upgrade button. The upgrade process will take about 3 minutes during which time your camera will restart. Do not unplug your camera or refresh your browser during this time. When the upgrade is complete, your browser will refresh automatically.

5. If presented with a Login window, enter your camera’s user name and password and click Login

6. Click the Settings tab

7. In the left sidebar, click Status

8. Click Device Information

9. Confirm that the version displayed in Application Firmware Version matches the updated application firmware


Restore Your HD WiFi Camera Preferences

1. In the left sidebar, click System 

2. Click Back-up & Restore

3. Click the Choose File button and select the configs.bin file that was downloaded to your computer previously

4. Click the Submit button. The restore process will take about 1 minute during which time your camera will restart. Do not unplug your camera or refresh your browser during this time. When the restore is complete, your browser will refresh automatically.


Identify Your WiFi Camera Firmware Version


Use this article to properly identify the System Firmware and Application Firmware version on Insteon HD WiFi Camera or the Device Firmware and Device Web UI version on Insteon SD WiFi Camera.


1. Ensure that your Insteon WiFi Camera is powered on and connected to your network. If your camera has not yet been configured, connect your camera to power and to your router using the provided ethernet cable.
 

2. Download and install the IP Camera Tool


3. Open the IP Camera Tool; it may take several moments to find the WiFi Camera on your network.

4. For the desired camera, right-click on a PC or control-click on a Mac and select Basic Properties

5. Check the Firmware Version displayed against the current System Firmware version available. Check the Web UI Version against the current Application Firmware version available.