Verizon/Actiontec Router/Modem - Port Forwarding Guide

Actiontec GT704WG & GT704WGB gateways

Step 1: Open your web browser and enter router’s IP address (192.168.0.1 by default) in the address bar. Enter username (“admin” by default) and then password (“password” by default).

Step 2: Navigate to Security > Applications. Select the camera on your network where you want to use port forwarding in the PC Name field. Select User in the Category list and click New.

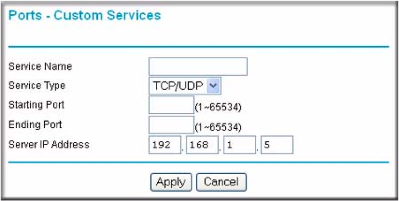
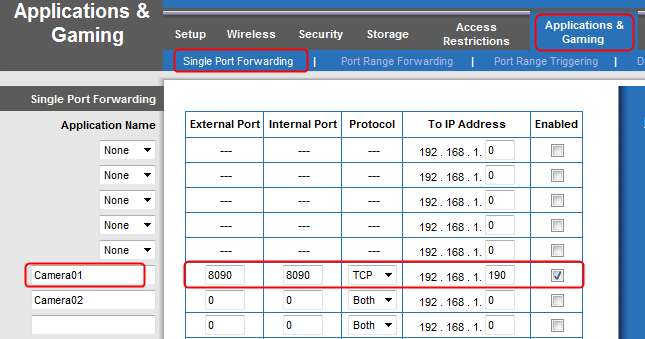
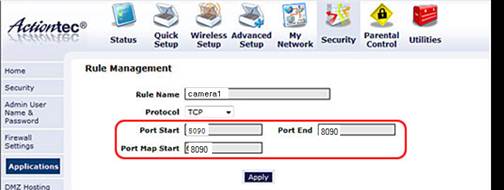
Step 3: Enter a name for your port forwarding rule in the Rule Name field. 
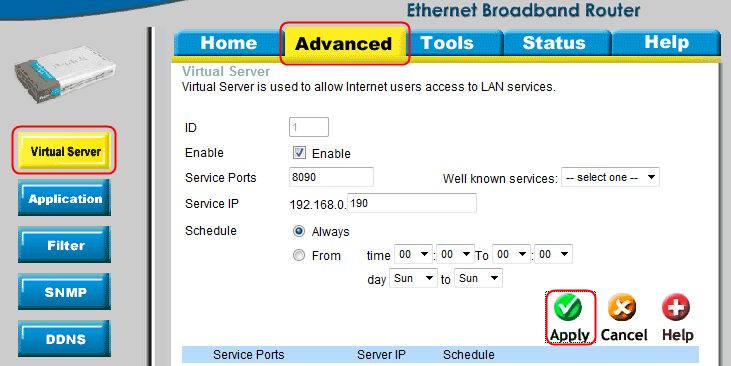
Select TCP in protocol and enter camera’s port number in port start, port end and port map start. Click Apply to save your rule settings.

Click Back to return to the Applications screen.

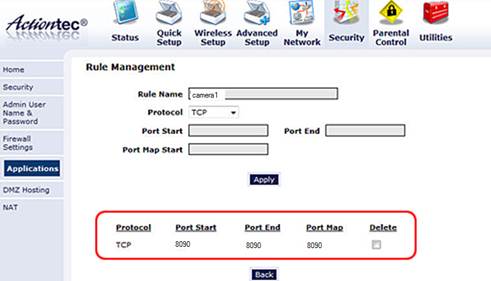
Step 4: Select the name of the rule you just created in the Available Rules box and click Add to use this port forwarding rule on camera. Click Apply.

You can check port is forwarded successful or not on
http://www.yougetsignal.com/tools/open-ports/


Thomson TG585 - Router/Modem Port Forwarding Guide

Note: This router/modem forwards based on computer name and not IP address. So there is no need to set a static IP.

Step 1: Open your web browser and enter router’s IP address (192.168.0.1 by default) in the address bar. Enter username ("admin" by default) and then password (blank by default)

Step 2: Navigate to Toolbox Game & ApplicationSharing. Once the page is done loading click on "Create a new game or application".

Step 3: For Name, give the new rule a name.
Choose "Manual Entry of Port Maps and then click "Next".

Step 4: For 'Protocol' Choose 'TCP'. For 'Port Range' enter camera’s port. Example: 2100 to 2100.  Click 'Add'.

Step 5: In the "Game or Application" list, choose the name of the new rule you created.
For "Device" you can either choose the computer name to forward to, or choose "User-Defined" to manually enter a IP address.
If you choose "User-Defined" a new text box will show up, enter the local IP to forward to here. 
Once you are all done click 'Add'.
If camera is "User-Defined", set a static IP address for camera first.

You can check port is forwarded successful or not on
http://www.yougetsignal.com/tools/open-ports


Netgear Router - Port Forwarding Guide

Step 1: Open your web browser and enter router’s IP address (192.168.0.1 by default) in the address bar. Enter username ("admin" by default) and then password (blank by default)

Step 2: Navigate to Port Forwarding/Port Triggering and select Port ForwardingSelect HTTP from the Service Name drop-down listClick Add Service button.


In the Service Name, type a name, like “camera”
In the Service Type, select TCP/UDP.
In the Starting Port, enter camera’s port number. Eg:8090
In the Ending Port, enter camera’s port number. Eg:8090
In the Server IP Address, enter camera’s IP address. Eg:192.168.1.5
Click Apply. You may need to restart the router for the changes to take effect.


You can check port is forwarded successful or not on
http://www.yougetsignal.com/tools/open-ports/


Linksys/Cisco Router - Port Forwarding Guide

Step 1: Open your web browser and enter router’s IP address (192.168.0.1 by default) in the address bar. Enter username ("admin" by default) and then password (blank by default)

Step 2: Click Applications & Gaming > Single Port Forwarding tab.
You enter a name what you like for the port forwarding. (Eg: Camera01)
Enter camera’s port number in External Port and Internal Port, select TCP for Protocol. (Eg: 8090)
Enter camera’s IP address and check Enable box. (Eg: 192.168.1.190)
After completing all the necessary entries, go to the bottom and click Save Settings.


You can check port is forwarded successful or not on
http://www.yougetsignal.com/tools/open-ports/


D-Link Router - Port Forwarding Guide

Step 1: Open your web browser and enter router’s IP address (192.168.0.1 by default) in the address bar. Enter username ("admin" by default) and then password (blank by default).

Step 2: Navigate to Advanced > Virtual Server
Enter the following information:
Check the box next to Enable.
Enter camera’s port in Service Ports. (Eg: 8090) 
Enter camera’s IP address in Service IP. (Eg: 192.168.0.190) 
Click Always in schedule.
Click Apply and then click Restart to save your changes.


You can check port is forwarded successful or not on
http://www.yougetsignal.com/tools/open-ports/


Belkin Router - Port Forwarding Guide

Step 1: Open your web browser and enter router’s IP address (192.168.0.1 by default) in the address bar. Enter username your router password (the default password is blank).

Step 2: Navigate to Firewall > Virtual Servers


Step 3: Check Enable
In the Description column enter a description of your network device (e.g. INSTEON Camera 1)
In “Inbound port” enter camera’s port number.
Next choose the “Type” you want to use. (For INSTEON cameras we will use TCP or Both)
Enter the Camera’s IP address in “Private IP Address”
In “Private port” enter camera’s port number.
Repeat step 5 for any more ports you want to forward.
Click on “Apply Changes”

You can check port is forwarded successful or not on
http://www.yougetsignal.com/tools/open-ports/


Port Forwarding Guides

The port forwarding set up is reliant upon the specific brand and model number of the router being used. The Insteon Hub (2012) and Insteon WiFi Cameras require forwarding for access to your network device from outside of your home network. The new Insteon Hub (2014) does not require port forwarding. Regardless of the router being used, the process of port forwarding is similar. Below is a list of port forwarding guides for popular routers:

Please follow the link below if your router is not listed.

Port Forwarding Guides

Understanding Linking

Links are One-Way

When linking Insteon devices, the links that are created are one-way.
 

Switch A will turn Switch B On and Off but
Switch B cannot turn Switch A On or Off

Links Remember a Device's State

The current state of the controlled device is stored in the link: On, Off, or Dimmed.

The switch will turn on the Lamp Dimmer to 75% brightness.


Controllers

Insteon devices that can turn other devices On or Off are called controllers.
 

Sensors, Switches, Keypads, and the Hub are common controllers.

Responders

Insteon devices that receive the command of a controller are called responders.

Switches, Keypads, Plug-In Modules and In-Line Modules  are common responders.


Controller-Only

Some devices, like sensors, can only control other devices.
 

Sup - Controller Only.png

The Motion Sensor will turn on the Switch but the switch cannot control the Motion Sensor.

Responder-Only

Some devices  cannot control other devices; these devices only receive Insteon commands.

The LED Bulb cannot control the Dimmer Switch but the Dimmer Switch can control the LED Bulb.


Grouping Devices

You may want to group together two devices, for example, in a virtual-three way configuration. For Insteon, this is called cross linking.

To mirror Switch A to Switch B so that they each control one another and the connected load, Cross Linking is necessary. 

Use Cross Linking

To Cross Link, simply turn on the devices and perform the linking process twice, once in each direction.

Link Switch A to Switch B and repeat to link Switch B to Switch A