Getting Started


Before getting started, make sure you have the following: 

  1. Insteon Hub 2. Don’t have one yet? Buy one here

  2. Insteon Hub Account Access. Buy one here.
    Note: new accounts include a limited trial access.

  3. Ensure your mobile device has the latest version of Director installed from Apple App Store or Google Play Store


Create an Account


  1. Select Create Account and follow the instructions to create account. 

Note: be sure to use the same email address as specified when purchasing the Hub Account Access subscription.


Add an Insteon Hub

Follow the instructions provided in the app to get your Insteon Hub connected.

Note: Insteon communicates simultaneously via the existing power lines in the home and radio frequency. To get the most out of your system, make sure the Insteon Hub is not plugged into a UPS, power conditioner, surge protected power strip or other filtering power source.


  1. During the setup process, the app will ask permission to use your mobile device camera. This is used to scan the code found on the underside label of the Insteon Hub. 

  2. Alternatively tapping the question mark (?) in the upper right corner allows you to enter the Hub’s User Name and Password also found on the underside label.


After successfully finding and connecting to your Hub, the app will ask to use your location so that it may configure the timezone and solar schedule for things like activating lights at sunset and off at sunrise. You may also enter the location manually by zip code. 

You’ll have a chance to confirm the location after found. You can also access this later under the Settings tab. 


Director will ask you to give your Insteon Hub  a name. This is especially helpful if you plan on adding Insteon to multiple properties. You can change this later under Settings. 


After Director has finished pairing the Hub to your account, you will be asked if you would like to have Director send you notifications. Director can alert you when things like sensors or wall switches are locally activated.

Note: if you don’t allow, you can always enable it under your mobile devices settings. 


Adding Devices

Select your device from the list and follow instructions for adding it to Director. 


  1. If you are unsure which device type you are adding, select Other Device.

  2. If you know the Insteon ID of the device you’re adding (and it is not battery powered), use the Add by Insteon ID option.


Introduction


The Insteon app is completely redesigned from the ground up. Packed with updated features and a new look, the Insteon app will be your control and monitoring center for all your Insteon devices. Here is everything you will need to know to get up and running with Insteon.

Requirements

  • Insteon Hub 2

  • Access Subscription

  • Apple mobile device running iOS version 11 or greater

  • Android device running OS version 6 or greater


General Overview


  1. Greeting. Changes throughout the day.

  2. Rooms. Swipe to navigate across rooms or tap room name to view room members.

  3. Tap circle icon to control device (On/Off).

  4. Device name and current state.

  5. Navigation for Devices, Senes, Schedules and Settings & Support.

  6. Tap to add a new device.

  7. Tap to resize device tiles.

  8. Tap anywhere in the tile to view more device control and access device settings.


Scenes Overview


Learn more about Scenes.

  1. Total number of scenes.

  2. Scene name and number of members.

  3. Tap to add a new scene.

  4. Tap to deactivate the scene (Group Off). Tap to deactivate the scene (Group Off).

  5. Tap anywhere else to go to scene editor.


Schedules Overview


  1. All of your schedules listed in one place. 

  2. Tap to add a new scene.

  3. Detail showing the On and/or Off times and days that the schedule is active as well as the name of the device or scene that is scheduled.


Settings & Help Overview


  1. Shows the email associated with your account.

  2. Location of home.

  3. Current Hub time.

  4. Turn On or Off Daylight Savings Time

  5. Define any + or - offsets for Sunrise or Sunset. Used when creating schedules.

  6. View all information about your Insteon Hub.

  7. Visit our store.

  8. Tap to Sign Out or Delete Account.

  9. Tap to add another home or to switch to another home.

  10. Tap to access support and feedback forms.

  11. View your home’s Insteon configuration and export data.

  12. Tap to re-sync location if incorrect or if current Hub time is incorrect.

  13. View and edit rooms.

  14. Grants Director access to send push notifications to mobile device.

  15. Check for updates to Hub firmware.

  16. Director version.

  17. Debug logs - customer support may request information here.


Monitor Your Home with Email and Push Notification Alerts


Monitor Your Home with Email and Push Notification Alerts

You can configure Insteon devices to send you email and/or app notifications (i.e. push notifications) when they are activated locally. Mostly this is used with sensors to let you know when motion is detected, a leak is detected, or a door/window has been opened. But you can also enable this to get an alert when a light switch has been turned on or off. 

Note: this only works for local control and will not generate alerts when something else turns switches on/off (e.g., when controlled from an app, scene, voice assistant, etc.).


  1. Tap the device tile to go into the full detail view. 

  2. Tap the gear icon to go to device settings.


Tap on the Notifications row.

Most devices will have a notification alert option for two different states. In this example, a leak sensor that has a notification for when it detects water and when it is clear (stops detecting water).


When you enable a Push Notification alert, a default message is displayed. Tap anywhere inside the Subject or Body field to edit the message.

Note: currently push notifications do not support bypassing a mobile devices Do Not Disturb/Sleep/Focus Mode. If you require that any Insteon Director push notifications are critical to receive at all time, please follow your mobile devices operating system instructions for allowing notifications from Insteon Director when those modes are enabled.


Email Notification shares the same Subject and Body message that Push Notification uses, but adds an Email field. Enter the recipient’s email address. Separate multiple email addresses with a comma.

Tip: Many mobile phone carriers offer the ability to send an email to text using your phone number as a prefix, followed by a special domain (e.g., 123456789@txt.att.net). To learn more, visit: https://www.insteon.com/support-knowledgebase/2015/4/8/send-alerts-via-sms-using-email-on-your-mobile-phone

When finished, tap Save.


If you’ve enabled email notifications and entered email addresses other than your the one associated with your account, you’ll be prompted to have the recipient check their inbox for an email asking to approve alerts. 


Scenes


First of all, what is a scene? 

Controlling devices directly through Director is a fast and easy way to turn lights on, off or set the lights to a dim level. But what happens if you want to control more than one device at a time? And what if you want each device to do different things (Living room light 50%, Ceiling light 25%, Dining room off, etc.)? 

Creating Scenes in Director offers a way to group more than one device together and control them using a single command. They also provide a super-fast and instantaneous response across all devices, regardless if it's a scene made up of 2 or 200 devices. And because you can set each scene member to a unique level, you can create incredible lighting effects. 

After creating a scene, you can create a schedule for it so it triggers automatically based on time of day or at sunrise or sunset. 

Creating a Scene

Creating a Scene

When creating a scene, you’ll be asked to pick how the scene will be controlled. We call scene controllers “Directors”. These directors can be any device, whether a button on a keypad, a wall switch, or sensor. You can also choose to only have the app be the scene director. 


When choosing devices with multiple buttons, such as a keypad or mini remote, tapping on the name will expand to display the available buttons. Note: for keypads you may need to wait a bit longer after tapping the name while the app reads the button configuration. 

Buttons that have already been associated with a scene will have the scene name displayed in the button and will be grayed out indicating they are not available to add to another scene as a director. 

Tapping on any available button will turn it green, indicating you’ve selected it. Tap the Done button if you are finished selecting your scene director or click the back arrow to select more scene directors.


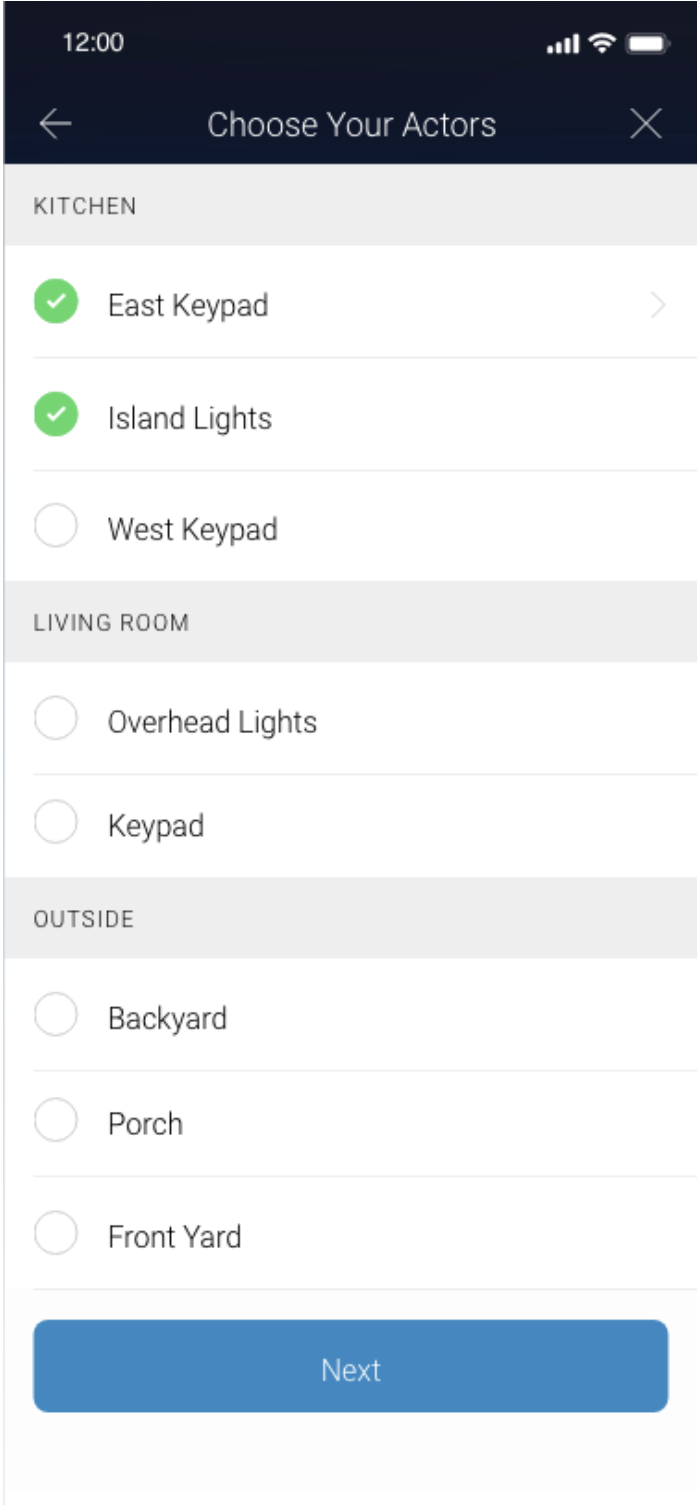
After tapping Done, you will be shown a list of your devices referred to as “Actors” that can be selected to respond to the scene. Note: devices that were selected as directors will show preselected. In the case of a multi-button device such as a keypad, you can tap on the name and select another available button on the keypad if you wish. 

Tap Next when you’re finished making your selection. 

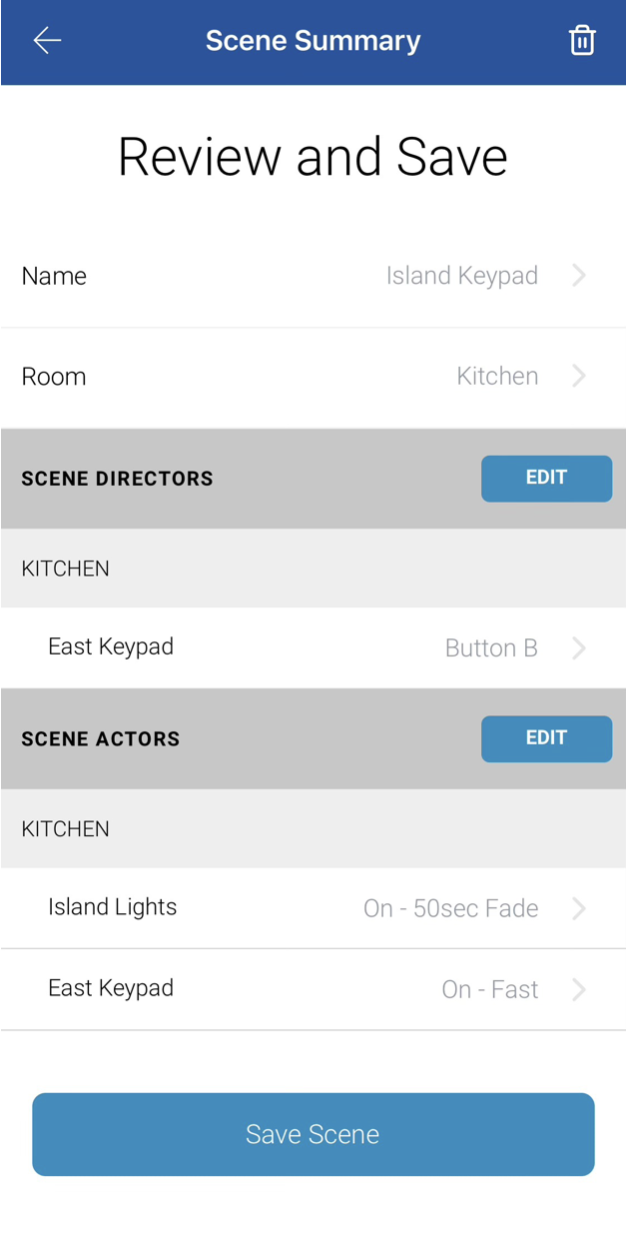
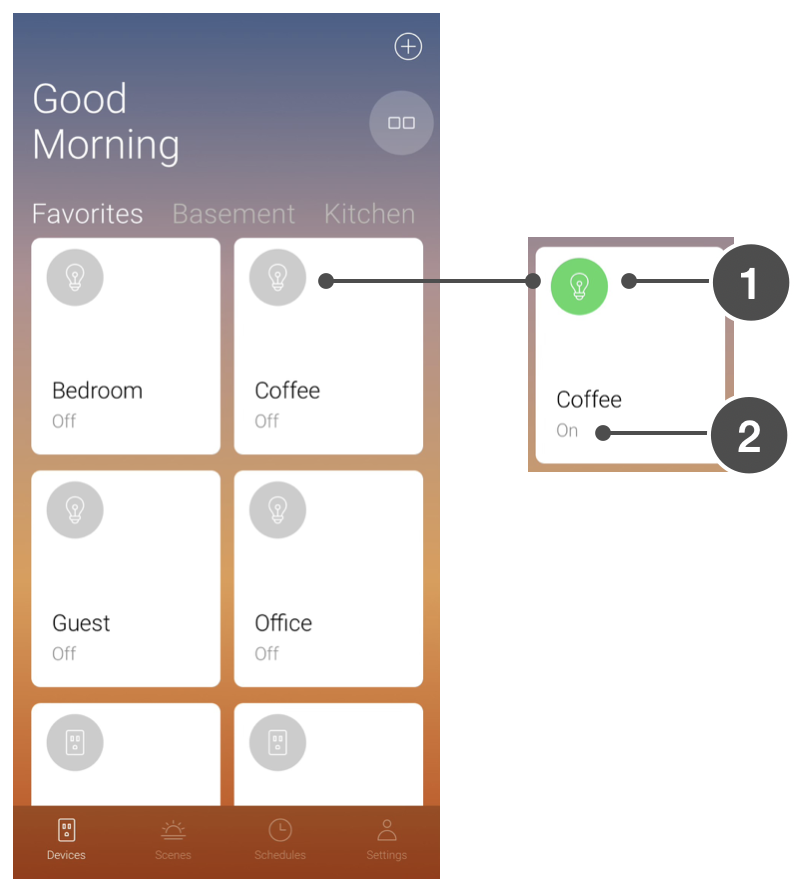
After you’ve selected your scene actors and tap Next, you’ll see a list of your selected devices. Tapping the name will expand to show you what actions you can define. 

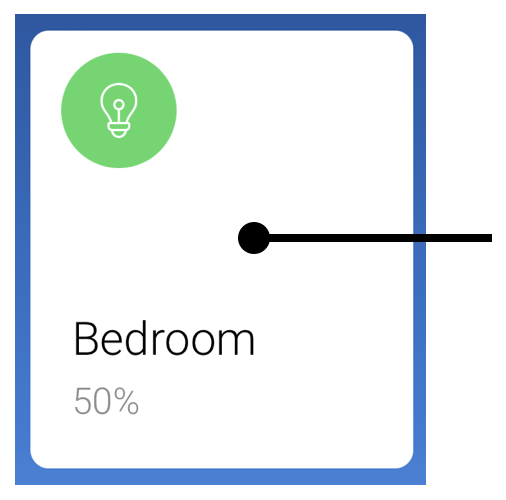
Dimmable devices have options for setting a percentage for dimming and Fade Speed, which determines how much time it will take to get to the dimming percentage.

For scenes with a large number of actors, you can save time by using the Shortcut Reactions at the top of the page. When you tap “On” or “Off”, all scene member settings will be set to that option. If you have dimmable devices, tapping “Dim to…” will allow you to set a specific dim level (e.g., 50%). Note: Fade Speed is not available as a shortcut here. You will need to adjust each dimmable device separately if wanting it to be customized.

When finished making scene adjustments, tap Next.


Review and Save

The final step in building a scene is the Review and Save page where you get a glance of scene directors and actors. Tap the edit button next to Scene Directors or Scene Actors to make any final edits. When ready, tap Save Scene. 

Note

  • If you have any battery-powered devices included, the app will prompt you to wake them up for programming. 

  • The time to program the scene may be a few seconds but if you have a lot of devices or keypad buttons to program, it may take a few minutes.


Control and Edit Scenes

 Controlling a Scene


  1. Tap to activate the scene (Group On).

  2. Tap to deactivate the scene (Group Off).

  3. Tap anywhere else to edit/review the scene.


  1. Tap Name or Room to edit.

  2. To make changes to scene directors, tap edit.

  3. To make changes to scene actors, tap edit.

  4. The button will display “Re-Write Scene” if no changes have been made to scene members. Tapping “Re-Write Scene” is helpful if a device wasn’t saved correctly or errors occurred when previously saving the scene. If you have made a change to the scene members, the button will say “Update Scene”.


Control and Status of Devices


Insteon offers a wide variety of device types. To learn how to control and monitor the status of your device using the Insteon Director app, pick from the following list that best matches your device.

On/Off Devices

Dimmer Devices

Keypads

Mini Remotes

Ceiling Fan Controller

IO Modules

Sensors

On/Off Devices


  1. Tap the circle icon to control it. Green means it’s On. Gray means it’s Off.

  2. The state will also display below the name.


For more control and to access device details, tap anywhere else on the tile.


When the device is On the white switch will be at the top. Swipe it down or tap the bottom to turn it off. 

When the device is Off the white switch will be at the bottom. Swipe it down or tap the bottom to turn it off.

Tap the heart to place the device in Favorites. Tap the gear to view device details.


Dimmable Devices

Dimmable devices are available in wall switches, plug-in modules, and more.


  1. Tap the circle icon to control it. Green means it’s On. Gray means it’s Off.

  2. The state will also display below the name.


For more control and to access device details, tap anywhere else on the tile.

The brightness level is shown when on. Slide the bar to adjust the level. 

To turn Off, tap the Off button or slide the bar all the way to the bottom.

Tap the heart to place the device in Favorites. Tap the gear to view device details.


Shop for Insteon Keypads. 

Controlling the load that the keypad is wired to is currently the same as On/Off Devices (for On/Off Keypads or i3 Keypad in On/Off Mode) and Dimmable Devices (for Dimmer Keypads or i3 Keypad in Dimmer Mode).

If the buttons have scenes associated with them, use the scene controls under the Scene tab.


Mini Remotes

Insteon Mini Remotes are an extremely helpful wireless controller that can be configured to  control single devices or scenes. They are available in a 1 scene, 4 scene, and 8 scene configurations.


1 Scene

4 Scene

8 Scene


Device tiles for Mini Remotes will simply display the name you’ve given it.

Tapping anywhere on the tile will take you to the full view.

If you don’t have any scenes assigned to the buttons, you’ll see a message prompting you to do so.


Note: If your assigned scene contains dimmable devices, Director controls don’t currently support press & holding for dimming or brightening as is possible with your Mini Remote.


1 Scene Full View Example


  1. Tap top of paddle to turn On (activate) the associated scene.

  2. The name of the associated scene.

  3. Tap the heart to place the device in Favorites. Tap the gear to view device details.

  4. Tap bottom of paddle to turn Off (deactivate) the associated scene.

Note: If your assigned scene contains dimmable devices, Director controls don’t currently support press & holding for dimming or brightening as is possible with your Mini Remote.


4 Scene Full View Example


  1. The name of the associated scene.

  2. Tap left side of button to turn Off (deactivate) the associated scene.

  3. Tap the heart to place the device in Favorites. Tap the gear to view device details.

  4. Tap right side of button to turn On (activate) the associated scene.

  5. If a button on the Mini Remote is not controlling a scene, it will display “unassigned”.


8 Scene Full View Example


  1. The name of the associated scene.

  2. Tap left side of button to turn Off (deactivate) the associated scene.

  3. Tap the heart to place the device in Favorites. Tap the gear to view device details.

  4. Tap right side of button to turn On (activate) the associated scene.

  5. If buttons on the Mini Remote are not controlling a scene, it will display “unassigned”.

Note: If your assigned scene contains dimmable devices, Director controls don’t currently support press & holding for dimming or brightening as is possible with your Mini Remote.


Ceiling Fan Controller


Control the fan speed and lighting kit wirelessly from any Insteon controller, be it a handheld remote, wall keypad or from Director app. Learn more.


From the room tile, you can control and monitor both the fan speed and the light (if one is connected).


  1. Tap the fan icon to progresses through the following: Low, Med, High, and Off.

  2. The state of the fan is displayed below the name in the lower left. 

  3. Tap the bulb icon to turn the light on and off.

  4. For more control and to access device details, tap anywhere else on the tile.

  5. The state of the light is displayed below the name in the lower right. 


  1. Fan speed control.

  2. Tap the heart to place the device in Favorites. Tap the gear to view device details.

  3. Fan light brightness control.

  4. Fan light control.


IO Modules

I/O Module's flexible output relay can control many different types of low voltage devices, from pool valves to electric door strikes to garage doors due to its different relay modes. When controlling devices like pool valves, you will want the ability to leave it on for an extended period of time, giving it plenty of time to fill the pool. As it approaches the desired water level, then you can remotely turn it off. For devices like electric door strikes, set I/O Module's output relay to momentary, allowing you open the front gate using a Mini Remote*, Keypad button or any other Insteon controller. Learn more.


  1. Tap the circle icon to control the relay. Gray means the relay is Open. Clear means the relay is Closed. The state will also display below the name on the left. 

  2. This will refer to the state of a wired sensor*. Green means it’s Open. Red means it’s Closed.

  3. The state will also display below the name on the right.

  4. For more control and to access device details, tap anywhere else on the tile.


    *If you do not have a sensor wired to the IO Module, ignore the icon here. 

IO Module Full View


  1. State of relay. Red is Open, Green is Closed.

  2. Tap the heart to place the device in Favorites. Tap the gear to view device details.

  3. State of sensor. Green is Closed, Red is Open.

  4. Tap top of paddle to send On / Close Relay.

  5. Tap bottom of paddle to send Off / Open Relay.


Monitoring Sensors

The Insteon Director app can configure sensors to control devices by creating a scene. You can also set up push notifications or email notifications when a sensor is activated. 

Insteon wireless sensors include Open/Close Sensor, Hidden Door Sensor, Motion Sensor, and Leak Sensor


  1. State of sensor is shown here. Depending upon the sensor type, Red=Open, Motion Detected, Water. Gray=Closed, No Motion, Dry.

  2. For more information and to access device details, tap anywhere on the tile.


In-app notifications appear at the top of the screen while using Director.


  1. Sensors report daily. If your sensor has missed any check-ins, we’ll let you know here. Note: some sensors don’t report. If that’s the case, we will let you know here.

  2. Tap the heart to place the device in Favorites. Tap the gear to view device details and to configure alert notifications. Learn how to enable alerts.

To learn more about how Director monitors battery-powered devices, visit the following page: https://www.insteon.com/support-knowledgebase/director-app-sensor-monitoring 


Sensor Response Issues

If a sensor has lost connection with the hub, either by dead battery or communication issue, the app will display a “No response” and the tile will change color indicating an issue. If you tap on the tile, you will see steps you can take to fix the issue. 

To learn more about sensors reporting this message, visit the following page:

https://www.insteon.com/support-knowledgebase/director-app-sensor-no-response